
Setup and Install


Installing HyperFabric
Installing HyperFabric Switches
Chapter 3
71
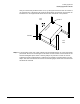
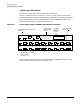
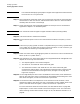
that you cannot easily slide the switch. If so, try lifting the switch over the rail screws. If
you cannot do this, remove the rail screws, slide the switch into position, and put the rail
screws back in. The figure below shows the rack with the switch in this position.
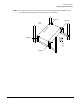
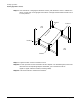
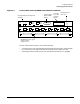
Step 5. From the back of the rack, install a bracket on the outside of each rail, using two screws
per bracket. Be sure to use the upper screw holes on each bracket. Put the screws in the
seventh and eighth square holes—counting away from yourself—in each rail. Do not
tighten the screws. These brackets—referred to as “bracket 3” and “bracket 4” in these
steps—will secure the back of the switch. The following figure shows the rack with these
two brackets installed.
bracket 1
bracket 2
front
back
rack
rack
f
r
o
n
t
o
f
s
w
i
t
c
h