
Setup and Install


Installing HyperFabric
Installing HyperFabric Switches
Chapter 3
68
Steps for Installing the HF1 Switch
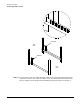
This section contains information for installing a HF1 switch. As mentioned earlier, the
HF1 switch must be mounted using the rail kit shipped with the switch.
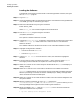
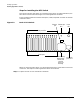
Figure 3-2 below shows the locations of the ports, LEDs, and power cord inlet on the back
of the HF1 switch.
Figure 3-2 Back of HF1 Switch
When you install the HF1 switch, you will be putting the front of the switch at the front
of the rack. The steps for installing the HF1 switch are as follows:
Step 1. Prepare the rack for rail and switch installation.
0
1
5
6
Ethernet
Power
Switch ports
Switch port LEDs
Ethernet
port
LED
Power
Label showing
Ethernet MAC
address and
port LED
colors and
meanings
AC Inlet for
LED
Ethernet port
power cord
2
3
7 9
4
8
10
13
1514
11 12