HP ZR2330w IPS LED Backlit LCD Monitor User Guide
© 2012, Hewlett-Packard Development Company, L.P. Microsoft, Windows, and Windows Vista are either trademarks or registered trademarks of Microsoft Corporation in the United States and/or other countries. The only warranties for HP products and services are set forth in the express warranty statements accompanying such products and services. Nothing herein should be construed as constituting an additional warranty. HP shall not be liable for technical or editorial errors or omissions contained herein.
About This Guide This guide provides information on product features, setting up the monitor, and technical specifications. WARNING! Text set off in this manner indicates that failure to follow directions could result in bodily harm or loss of life. CAUTION: Text set off in this manner indicates that failure to follow directions could result in damage to equipment or loss of information. NOTE: Text set off in this manner provides important supplemental information.
iv About This Guide
Table of contents 1 Product Features ............................................................................................................................................ 1 HP IPS LCD Monitor ............................................................................................................................ 1 2 Setting Up the Monitor ...................................................................................................................................
vi
1 Product Features HP IPS LCD Monitor The LCD (liquid crystal display) monitor has an active matrix, IPS (in-plane switching) panel. The monitor features include: ● 58.
2 ● Intelligent Management AssetControl ● Compliant with the following regulated specifications (for additional certifications and agency notices, refer to the HP LCD Monitors Reference Guide on the CD included with this monitor): ◦ European Union CE Directives ◦ Swedish TCO Requirements Chapter 1 Product Features
2 Setting Up the Monitor To set up the monitor, ensure that the power is turned off to the monitor, computer system, and other attached devices, then follow the instructions below. Unfolding the Monitor Pedestal Base 1. Lift the monitor from its box and place it face down on a flat surface. 2. Hold down the monitor base with one hand (1) then grasp the top of the stand with the other hand and unfold the display head 90 degrees (2). CAUTION: Do not touch the surface of the LCD panel.
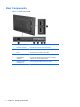
Rear Components Figure 2-2 Rear Components 4 Component Function 1 AC Power Connector Connects the AC power cord to the monitor. 2 DisplayPort Connects the DisplayPort cable to the monitor. 3 DVI-D Connects the DVI-D cable to the monitor. 4 VGA Connects the VGA cable to the monitor. 5 USB Upstream Connector Connects the USB hub cable to the monitor's USB hub connector and to a host USB port/hub. 6 USB Downstream Connectors (2) Connects optional USB devices to the monitor.
Connecting the Cables 1. Place the monitor in a convenient, well-ventilated location near the computer. 2. Remove the cable management clip from the pedestal by pulling outward on the two sides of the clip (1) then lifting the clip off the pedestal (2). Figure 2-3 Removing the Cable Management Clip 3. Connect a VGA signal cable, DVI-D signal cable, or DisplayPort signal cable. Refer to Figure 2-4 Connecting the Cables on page 6. NOTE: The monitor is capable of supporting either analog or digital input.
5. Connect one end of the power cord to the AC power connector on the back of the monitor, and the other end to an electrical wall outlet. Figure 2-4 Connecting the Cables WARNING! To reduce the risk of electric shock or damage to the equipment: Do not disable the power cord grounding plug. The grounding plug is an important safety feature. Plug the power cord into a grounded (earthed) electrical outlet that is easily accessible at all times.
Front Panel Controls Figure 2-6 Monitor Front Panel Controls Table 2-1 Monitor Front Panel Controls Control Function 1 Menu Opens, selects or exits the OSD menu. 2 Minus If the OSD menu is on, press to navigate backward through the OSD menu and decrease adjustment levels. 3 Plus/source If the OSD menu is on, press to navigate forward through the OSD menu and increase adjustment levels.
Adjusting the Monitor 1. Tilt the monitor's panel forward or backward to set it to a comfortable eye level. Figure 2-7 Tilting the Monitor 2. Swivel the monitor to the left or right for the best viewing angle.
3. Adjust the monitor’s height to a comfortable position for your individual workstation. The monitor’s top bezel edge should not exceed a height that is parallel to your eye height. A monitor that is positioned low and reclined may be more comfortable for users with corrective lenses. The monitor should be repositioned as you adjust your working posture throughout the work day. NOTE: When the monitor is unfolded for the first time, the display head is locked from adjusting to a full-height position.
4. Pivot the monitor from landscape to portrait orientation viewing to adapt to your application. a. Adjust the monitor to full height position and tilt the monitor back to full tilt position (1). b. Pivot the monitor clockwise 90° from landscape to portrait orientation (2). CAUTION: If the monitor is not in full height and full tilt position when pivoting, the bottom right corner of the monitor panel will come in contact with the base and potentially cause damage to the monitor.
NOTE: You can disable the power LED in the OSD menu. Press the Menu button on the front of the monitor, then select Management > Bezel Power LED > Off. When the monitor is powered on, a Monitor Status message is displayed for five seconds.
Connecting USB Devices USB connectors are used to connect devices such as a digital camera, USB keyboard, or USB mouse. Two USB connectors are located on the side panel of the monitor. NOTE: You must connect the USB hub cable from the monitor to the computer to enable the USB 2.0 ports on the monitor. Refer to Step 4 in Connecting the Cables on page 5.
Removing the Monitor Pedestal Base You can remove the monitor panel from the pedestal base to install the panel on a wall, an optional swing arm, or other mounting fixture. CAUTION: Before beginning to disassemble the monitor, be sure the monitor is turned off and the power and signal cables are both disconnected. Also disconnect all USB cables connected to the monitor. 1. Disconnect and remove the signal, power, and USB cables from the monitor. 2.
Mounting the Monitor The monitor panel can be attached to a wall, optional swing arm, or other mounting fixture. Mounting solutions are sold separately. NOTE: 1. This apparatus is intended to be supported by UL or CSA Listed wall mount bracket. Remove the monitor panel from the pedestal base. Refer to Removing the Monitor Pedestal Base on page 13. CAUTION: This monitor supports the VESA industry standard 100 mm mounting holes. To attach a third-party mounting solution to the monitor, four 4 mm, 0.
Locating the Rating Labels The rating labels on the monitor provide the spare part number, product number, and serial number. You may need these numbers when contacting HP about the monitor model. The rating labels are located on the rear panel of the monitor display head. Figure 2-15 Locating the Rating Labels Installing a Cable Lock You can secure the monitor to a fixed object with an optional cable lock available from HP.
3 Finding More Information Reference Guides Refer to the HP LCD Monitors Reference Guide included on the CD with your monitor for additional information on: ● Optimizing monitor performance ● Safety and maintenance guidelines ● Installing software from the CD ● Using the OSD menu ● Downloading software from the Web ● Agency regulatory information ● Troubleshooting and recommended solutions to common problems For information on theft deterrence, refer to the HP Display Assistant User Guide in
A Technical Specifications NOTE: All specifications represent the typical specifications provided by HP's component manufacturers; actual performance may vary either higher or lower. ZR2330w IPS Table A-1 Specifications Display 58.42 cm wide screen 23 inches wide screen Type IPS LCD Viewable Image Size 58.42 cm diagonal Tilt -5 to 30° Swivel -180 to 180° Maximum Weight (Unpacked) 6.8 kg 15.0 lbs Height (highest position) 46.62 cm 18.37 inches Height (lowest position) 35.11 cm 13.
Table A-1 Specifications (continued) Altitude: Operating 0 to 5000 m 0 to 16,400 feet Storage 0 to 12192 m 0 to 40,000 feet Measured Power Consumption: 18 Full Power 40 watts Typical Settings 35 watts Energy Star® Test Methods 33.1 watts Sleep 0.5 watts Switch Off 0.
Recognizing Preset Display Resolutions The display resolutions listed below are the most commonly used modes and are set as factory defaults. This monitor automatically recognizes these preset modes and they will appear properly sized and centered on the screen. Table A-2 Factory Preset Modes Preset Pixel Format Horz Freq (kHz) Vert Freq (Hz) 1 640 × 480 31.469 59.940 2 720 × 400 31.469 70.087 3 800 × 600 37.879 60.317 4 1024 × 768 48.363 60.004 5 1280 × 720 45.00 60.
Energy Saver Feature The monitors support a reduced power state. The reduced power state will be entered into if the monitor detects the absence of either the horizontal sync signal and/or the vertical sync signal. Upon detecting the absence of these signals, the monitor screen is blanked, the backlight is turned off, and the power light is turned amber. When the monitor is in the reduced power state, the monitor will utilize .5 watts of power.