
HP StorageWorks XP Disk Array Configuration Guide (T5278-96047, May 2011)
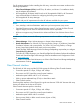
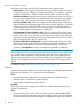
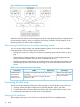

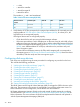
Table Of Contents
- XP Disk Array Configuration Guide
- Contents
- 1 Overview
- 2 HP-UX
- Installation roadmap
- Installing and configuring the disk array
- Installing and configuring the host
- Connecting the disk array
- Configuring disk array devices
- Verifying the device files and drivers
- Creating the device files
- Creating the physical volumes
- Creating new volume groups
- Creating logical volumes
- Creating the file systems
- Setting the I/O timeout parameter
- Creating the mount directories
- Mounting and verifying the file systems
- Setting and verifying the auto-mount parameters
- 3 Windows
- 4 Novell NetWare
- 5 NonStop
- 6 OpenVMS
- 7 VMware
- 8 Linux
- 9 Solaris
- Installation roadmap
- Installing and configuring the disk array
- Installing and configuring the host
- Connecting the disk array
- Configuring disk array devices
- Configuring for use with Veritas Volume Manager 4.x and later
- 10 IBM AIX
- 11 Citrix XenServer Enterprise
- 12 Troubleshooting
- 13 Support and other resources
- A Path worksheet
- B Path worksheet (NonStop)
- C Disk array supported emulations
- D Using Veritas Cluster Server to prevent data corruption
- E Reference information for the HP System Administration Manager (SAM)
- F HP Clustered Gateway deployments
- Glossary
- Index

Use the ioscan –f command, and verify that the rows shown in the example are displayed. If
these rows are not displayed, check the host adapter installation (hardware and driver installation)
or the host configuration.
Example
# ioscan –f
Class I H/W Path Driver S/W State H/W Type Description
...
fc 0 8/12 fcT1 CLAIMED INTERFACE HP Fibre ...
lan 1 8/12.5 fcT1_cntl CLAIMED INTERFACE HP Fibre ...
fcp 0 8/12.8 fcp CLAIMED INTERFACE FCP Proto...
ext bus 2 8/12.8.0.255.0 fcpdev CLAIMED INTERFACE FCP Devic...
Verifying device recognition
Verify that the HP-UX system recognizes the new devices on the disk array.
If the SCSI paths were defined after the system is powered on, you must halt and restart the system
to allow the system to recognize the new devices.
To verify device recognition:
1. Log in to the system as root.
2. Display the device data to verify that the system recognizes the newly installed devices on the
disk array. Use the ioscan –fn command to display the device data.
On a system with a large LUN configuration, HP-UX cannot build device files on all LUNs.
Enter insf –e to build all missing device files.
Example
# ioscan -fn
Class I H/W Path Driver S/W State H/W Type...
bc 6 14 ccio CLAIMED BUS_NEXUS...
fc 1 14/12 fcT1 CLAIMED INTERFACE...
lan 2 14/12.5 fcT1_cntl CLAIMED INTERFACE...
fcp 1 14/12.8 fcp CLAIMED INTERFACE...
ext_bus 6 14/12.8.0.0.0 fcpmux CLAIMED INTERFACE...
disk 4 14/12.8.0.0.0.0.0 sdisk CLAIMED DEVCE...
disk 5 14/12.8.0.0.0.0.1 sdisk CLAIMED DEVICE...
ext_bus 7 14/12.8.0.255.0 fcpdev CLAIMED INTERFACE...
target 10 14/12.8.0.255.0.0 tgt CLAIMED DEVICE...
ctl 5 14/12.8.0.255.0.0.0 sctl CLAIMED DEVICE...
In the example:
• HP OPEN-9 device: SCSI bus number = 14/12, bus instance = 6, SCSI target ID = 0,
LUN = 0.
• HP OPEN-9*2 device: SCSI bus number = 14/12, bus instance = 6, SCSI target ID =
0, LUN = 1.
• If UNKNOWN is displayed for a disk, the HP 9000 system might be configured properly.
See the HP documentation or contact HP customer support for assistance with the HP
9000 system or the HP-UX operating system.
3. Enter the device data for each disk array device in a table. See “Path worksheet” (page 132).
4. Construct the device file name for each device, using the device information, and enter the
file names in your table. Use the following formula to construct the device file name:
cxtydz
where:
• x = SCSI bus instance number
• y = SCSI target ID
Connecting the disk array 19