
HP StorageWorks XP Disk Array Configuration Guide (T5278-96047, May 2011)
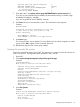
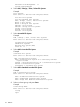
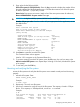
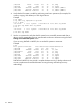


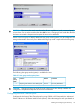
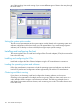
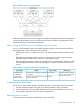

Table Of Contents
- XP Disk Array Configuration Guide
- Contents
- 1 Overview
- 2 HP-UX
- Installation roadmap
- Installing and configuring the disk array
- Installing and configuring the host
- Connecting the disk array
- Configuring disk array devices
- Verifying the device files and drivers
- Creating the device files
- Creating the physical volumes
- Creating new volume groups
- Creating logical volumes
- Creating the file systems
- Setting the I/O timeout parameter
- Creating the mount directories
- Mounting and verifying the file systems
- Setting and verifying the auto-mount parameters
- 3 Windows
- 4 Novell NetWare
- 5 NonStop
- 6 OpenVMS
- 7 VMware
- 8 Linux
- 9 Solaris
- Installation roadmap
- Installing and configuring the disk array
- Installing and configuring the host
- Connecting the disk array
- Configuring disk array devices
- Configuring for use with Veritas Volume Manager 4.x and later
- 10 IBM AIX
- 11 Citrix XenServer Enterprise
- 12 Troubleshooting
- 13 Support and other resources
- A Path worksheet
- B Path worksheet (NonStop)
- C Disk array supported emulations
- D Using Veritas Cluster Server to prevent data corruption
- E Reference information for the HP System Administration Manager (SAM)
- F HP Clustered Gateway deployments
- Glossary
- Index

9. Enter values for the following fields:
SIZE of file system (in 512-byte blocks). Enter the lsvg command to display the number of free
physical partitions and physical partition size. Calculate the maximum size of the file system
as follows: (FREE PPs - 1) x (PP SIZE) x 2048.
Mount Point: Enter mount point name. (Make a list of the mount point names for reference.)
Mount AUTOMATICALLY at system restart? Enter yes.
CAUTION: In high availability systems (HACMP and/or HAGEO), enter no.
Number of bytes per node. Enter the number of bytes appropriate for the application, or use
the default value.
Example
Add a Journaled File System
Type or select values in entry fields.
Press Enter AFTER making all desired changes.
[Entry Fields]
Volume group name vg01
SIZE of file system (in 512-byte blocks) [4792320]
MOUNT POINT [VG01]
Mount AUTOMATICALLY at system restart? no
PERMISSIONS read/write
Mount OPTIONS []
Start Disk Accounting? no
Fragment Size (bytes) 4096
Number of bytes per inode 4096
Compression algorithm no
Allocation Group Size (Mbytes) *1
10. Press Enter to create the Journaled File System.
The Command Status screen appears.
Wait for “OK” to appear on the Command Status line.
11. To continue creating Journaled File Systems, press the F3 screen. key until you return to the
Add a Journaled File System screen. Repeat steps 2 through 10 for each Journaled File System
to be created.
12. To exit SMIT, press the F10 key.
Mounting and verifying the file systems
Mount the file systems and verify that the file systems were created correctly and are functioning
properly.
1. Mount the file system. Enter:
mount mount_point_name
Example
# mount /vg01
2. Repeat step 1 for each new file system.
3. Use the df command to verify the size of the file systems. The capacity is listed in 512-byte
blocks. To list capacity in 1024-byte blocks, use the df –k command.
Example
# df
File system 512-blocks free %Used Iused %Iused Mounted on
/dev/hd4 8192 3176 61% 652 31% /
/dev/hd2 1024000 551448 46% 6997 5% /usr
/dev/hd9var 8192 5512 32% 66 6% /var
Configuring disk array devices 113