
HP StorageWorks XP Disk Array Configuration Guide (T5278-96047, May 2011)
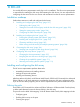
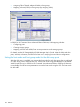

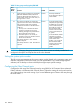
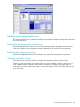
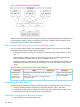
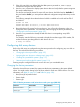
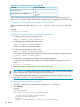
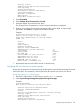
Table Of Contents
- XP Disk Array Configuration Guide
- Contents
- 1 Overview
- 2 HP-UX
- Installation roadmap
- Installing and configuring the disk array
- Installing and configuring the host
- Connecting the disk array
- Configuring disk array devices
- Verifying the device files and drivers
- Creating the device files
- Creating the physical volumes
- Creating new volume groups
- Creating logical volumes
- Creating the file systems
- Setting the I/O timeout parameter
- Creating the mount directories
- Mounting and verifying the file systems
- Setting and verifying the auto-mount parameters
- 3 Windows
- 4 Novell NetWare
- 5 NonStop
- 6 OpenVMS
- 7 VMware
- 8 Linux
- 9 Solaris
- Installation roadmap
- Installing and configuring the disk array
- Installing and configuring the host
- Connecting the disk array
- Configuring disk array devices
- Configuring for use with Veritas Volume Manager 4.x and later
- 10 IBM AIX
- 11 Citrix XenServer Enterprise
- 12 Troubleshooting
- 13 Support and other resources
- A Path worksheet
- B Path worksheet (NonStop)
- C Disk array supported emulations
- D Using Veritas Cluster Server to prevent data corruption
- E Reference information for the HP System Administration Manager (SAM)
- F HP Clustered Gateway deployments
- Glossary
- Index
System Environments
Processes & Subsystems
Applications
Using SMIT (information only)
3. Select Logical Volume Manager.
Example
System Storage Management (Physical & Logical Storage)
Move cursor to desired item and press Enter.
Logical Volume Manager
File Systems
Files & Directories
Removable Disk Management *1
System Backup Manager
4. Select Volume Groups.
Example
Logical Volume Manager
Move cursor to desired item and press Enter.
Volume Groups
Logical Volumes
Physical Volumes
Paging Space
5. Select Add a Volume Group.
Example
Volume Groups
Move cursor to desired item and press Enter.
List All Volume Groups
Add a Volume Group
Set Characteristics of a Volume Group
List Contents of a Volume Group
Remove a Volume Group
Activate a Volume Group
Deactivate a Volume Group
Import a Volume Group
Export a Volume Group
Mirror a Volume Group *1
Unmirror a Volume Group *1
Synchronize LVM Mirrors *1
Back Up a Volume Group
Remake a Volume Group
List Files in a Volume Group Backup
Restore Files in a Volume Group Backup
6. Enter or select values for the following fields:
Volume Group name (the volume group can contain multiple hdisk devices)
Physical partition size in megabytes, see Physical partition size table
Physical Volume names
To enter values, place the cursor in the field and type the value.
To select values, place the cursor in the field and press F4.
Example
Type or select values in entry fields.
Press Enter AFTER making all desired changes.
[Entry Fields]
VOLUME GROUP name [vg01]
110 IBM AIX