
HP XP P9500 Disk Array Configuration Guide (AV400-96496, May 2014)

3. Mounting the new volumes
4. Verifying client operations
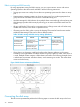
Creating scripts to configure all devices at once can save you considerable time.
Creating the disk partitions
Before you create the disk partitions, consult the Novell documentation for confirmation about the
type of partition that is available with your operating system version.
NetWare 5.x
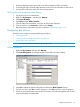
1. At the server console enter “LOAD NWCONFIG” to load the Configuration Options module.
2. On the Configuration Options screen, click Standard disk options and press Enter to access
the NetWare disk options.
3. On the Available Disk Options screen, select Modify disk partitions and Hot Fix and press
Enter.
4. The Available Disk Drives screen lists the devices by device number. Record the device numbers.
On the Available Disk Drives screen, select the device to partition, and then press Enter.
5. If the partition table has already been initialized, skip this step. If the partition table has not
been initialized, the partition table message is displayed. Press Enter to confirm the message.
When the Initialize the partition table? message appears, select Yes and press Enter to initialize
the partition table.
6. On the Disk Partition Options screen, select Create NetWare disk partition, and press Enter.
7. You are now prompted to create the partition either automatically or manually. Select the
desired option, and press Enter.
If you select automatic partitioning, NetWare will create the disk partition and hot fix area
using the available disk space (the hot fix area will be approximately two percent of the
partition size). If you select manual partitioning, enter a partition size and hot fix area.
8. On the Disk Partition Information screen, verify (or enter) the partition size and hot fix data
area size, and press F10 to save the changes. The Disk Partition Options screen appears.
9. Select Create NetWare disk partition again, and press Enter.
10. When the Create NetWare Partition? message appears, click Yes and press Enter to create
the specified disk partition on the selected device.
11. Press Esc until you are returned to the Available Devices screen. Repeat Step 4–Step 10 to
create the disk partition on each new OPEN-x and LUSE device.
12. When you are finished creating disk partitions, return to the Available Disk Options screen,
click Return to previous menu and press Enter.
NetWare 6.0
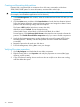
1. Start ConsoleOne on the Windows server.
2. Select and right-click the targeted server, and then click Properties.
3. Select the Media tab, click Devices, and then initialize the new devices.
4. Click the Partitions option on the Media tab, select the desired device, and then select New....
The Create a new partition screen appears.
5. On the Create a new partition screen, select the desired device, select NSS in the Type box,
and click OK.
6. Enter the partition size in bytes (B), kilobytes (KB), megabytes (MB), or gigabytes (GB), and
then click OK.
Configuring disk devices 39