
HP XP P9000 Provisioning for Mainframe Systems User Guide
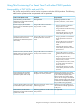
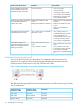
Table Of Contents
- HP XP P9000 Provisioning for Mainframe Systems User Guide
- Contents
- 1 Introduction to provisioning
- About provisioning
- Basic provisioning
- Fixed-sized provisioning
- Disadvantages
- When to use fixed-sized provisioning
- Custom-sized provisioning
- When to use custom-sized provisioning
- Basic provisioning workflow
- Thin Provisioning Overview
- Thin Provisioning Z
- Thin Provisioning Z concepts
- When to use Thin Provisioning Z
- Thin Provisioning Z advantages
- Thin Provisioning Z advantage example
- Thin Provisioning Z work flow
- Smart Tiers Z
- Tiers concept
- When to use Smart Tiers Z
- Resource groups strategies
- Complimentary strategies
- Key terms
- Before you begin
- About pool volumes
- 2 Configuring resource groups
- System configuration using resource groups
- Resource groups examples
- Meta_resource
- Resource lock
- User groups
- Resource group assignments
- Resource group license requirements
- Resource group rules, restrictions, and guidelines
- Creating a resource group
- Adding resources to a resource group
- Removing resources from a resource group
- Managing Resource Groups
- Using Resource Partition and other P9500 products
- 3 Configuring custom-sized provisioning
- Virtual LVI/Virtual LUN functions
- VLL requirements
- VLL specifications
- SSID requirements
- VLL size calculations
- Create LDEV function
- Blocking an LDEV
- Restoring a blocked LDEV
- Editing an LDEV name
- Deleting an LDEV (converting to free space)
- Formatting LDEVs
- Making external mainframe system volumes usable
- Assigning a processor blade
- Using a system disk
- 4 Configuring thin provisioning
- Thin Provisioning Z overview
- Smart Tiers Z overview
- Thin provisioning requirements
- Using Thin Provisioning Z or Smart Tiers Z with other P9500 products
- Thin Provisioning Z workflow
- Smart Tiers Z
- About tiered storage
- Tier monitoring and data relocation
- Smart Pool
- Tier monitoring and relocation cycles
- Tier relocation flow
- Tier relocation rules, restrictions, and guidelines
- Buffer area of a tier
- Smart Tiers Z cache specifications and requirements
- Execution modes for tier relocation
- Monitoring modes
- Notes on performing monitoring
- Downloading the tier relocation log file
- Tiering policy
- Tiering policy expansion
- Tiering policy examples
- Setting tiering policy on a THP V-VOL
- Tiering policy levels
- Viewing the tiering policy in the performance graph
- Reserving tier capacity when setting a tiering policy
- Example of reserving tier capacity
- Notes on tiering policy settings
- New page assignment tier
- Relocation priority
- Assignment tier when pool-VOLs are deleted
- Formatted pool capacity
- Rebalancing the usage level among pool-VOLs
- Execution mode settings and tiering policy
- Changing the tiering policy level on a THP V-VOL
- Changing new page assignment tier of a V-VOL
- Opening the Edit Tiering Policies window
- Changing a tiering policy
- Changing relocation priority setting of a V-VOL
- Smart Tiers Z workflow
- Smart Tiers Z tasks and parameters
- Managing Smart Tiers Z
- Changing a pool for Smart Tiers Z to a pool for Thin Provisioning Z
- Working with pools
- Working with THP V-VOLs
- Thresholds
- Working with SIMs
- Managing pools and THP V-VOLs
- Viewing pool information
- Viewing formatted pool capacity
- Viewing the progress of rebalancing the usage level among pool-VOLs
- Increasing pool capacity
- Changing a pool name
- Recovering a blocked pool
- Decrease pool capacity
- Deleting a tier in a pool
- Deleting a pool
- Changing external LDEV tier rank
- Increasing THP V-VOL capacity
- Changing the name of a THP V-VOL
- About releasing pages in a THP V-VOL
- Enabling/disabling tier relocation of a THP V-VOL
- Deleting a THP V-VOL
- 5 Configuring access attributes
- 6 Protecting volumes from I/O operations
- Overview of Volume Security for Mainframe
- Volume Security for Mainframe Requirements
- Volume Security for Mainframe Functions
- Protecting Volumes from I/O Operations at Mainframe Hosts
- Warnings Regarding Volume Security for Mainframe
- Supported Volume Emulation Types
- Maximum Number of Groups
- Maximum Number of Hosts and Volumes
- Launching Volume Security for Mainframe
- Viewing Security Settings
- Locating Volumes in a Specified Security Group
- Locating Security Groups that Contain a Specified Host
- Locating Volumes in a Security Group that Contains a Specified Host
- Locating Ports through Which Hosts Can Access Volumes
- Locating Security Groups that Contain a Specified Volume
- Locating Hosts in a Security Group that Contains a Specified Volume
- Locating Security Groups that Contain a Specified Host Group
- Locating Security Groups that Contain a Specified LDEV Group
- Limiting Host Access
- Prohibiting Host Access
- Protecting Volumes from Copy Operations
- Disabling Volume Security for Mainframe
- Editing Security Groups
- Editing Host Groups
- Editing LDEV Groups
- 7 Troubleshooting
- 8 Support and other resources
- A RAID Manager command reference
- B Resource Partition GUI reference
- C LDEV GUI reference
- Parity Groups window
- Parity Groups window after selecting Internal (or External) under Parity Groups
- Window after selecting a parity group under Internal (or External) of Parity Groups
- Window after selecting Logical Devices
- Create LDEVs wizard
- Edit LDEVs wizard
- Change LDEV Settings window
- View SSIDs window
- Select Free Spaces window
- Select Pool window
- View LDEV IDs window
- View Physical Location window
- Edit SSIDs window
- Change SSIDs window
- Format LDEVs wizard
- Restore LDEVs window
- Block LDEVs window
- Delete LDEVs window
- LDEV Properties window
- Top window when selecting Components
- Top window when selecting controller chassis under Components
- Edit Processor Blades wizard
- Assign Processor Blade wizard
- View Management Resource Usage window
- D Thin Provisioning Z and Smart Tiers Z GUI reference
- Pools window after selecting pool (Pools window)
- Top window when selecting a pool under Pools
- Create Pools wizard
- Expand Pool wizard
- Edit Pools wizard
- Delete Pools wizard
- Expand V-VOLs wizard
- Restore Pools window
- Shrink Pool window
- Stop Shrinking Pools window
- Complete SIMs window
- Select Pool VOLs window
- Reclaim Zero Pages window
- Stop Reclaiming Zero Pages window
- Pool Property window
- View Tier Properties window
- Monitor Pools window
- Stop Monitoring Pools window
- Start Tier Relocation window
- Stop Tier Relocation window
- View Pool Management Status window
- Edit External LDEV Tier Rank wizard
- Edit Tiering Policies wizard
- Change Tiering Policy Window
- E Volume Retention GUI reference
- F Volume Security for Mainframe GUI reference
- Volume Security for Mainframe window
- Add/Change Security Group Dialog Box
- Add/Change Host Group Dialog Box
- Add/Change LDEV Group Dialog Box
- Select LDEV Dialog Box
- Select Port Dialog Box
- Specify Security Group Dialog Box
- Host to Security Group Dialog Box
- Host to LDEV Dialog Box
- Host Group to Security Group Dialog Box
- Host Group to Port Dialog Box
- LDEV to Security Group Dialog Box
- LDEV to Host Dialog Box
- LDEV Group to Security Group Dialog Box
- Error Detail Dialog Box
- Glossary
- Index

5. Click Finish.
6. In the Confirm window, confirm the settings, in Task Name type a unique name for this task
or accept the default, and then click Apply.
If Go to tasks window for status is checked, the Tasks window opens.
Changing the processor blade assigned to an LDEV
1. In the Remote Web Console main window, in the Storage Systems tree, select Logical Devices.
LDEVs are shown in the LDEVs tab.
2. Select the LDEV for which you want to change the processor blade.
3. Click More Actions, and then select Assign MP Blade.
4. In the Assign Processor Blade window, specify the processor blade in Processor Blade.
5. Click Finish.
6. In the Confirm window, confirm the settings, in Task Name type a unique name for this task
or accept the default, and then click Apply.
If Go to tasks window for status is checked, the Tasks window opens.
CAUTION:
• The processor blade assigned to the LDEV is used as a utility volume for Compatible XRC and
can be changed only when the XRC session is suspended and the number of the side files of
the target session is zero.
• Changes to the processor blade ID of an LDEV should be made during off-peak hours when
the I/O load is as low as possible. Before and after changes are made, it is recommended
that the cache write-pending rate (%) for all CLPRs is lower than 50%. Do not change the
processor blade ID when the I/O load is high -- for example during an initial copy operation
of Business Copy Z, Continuous Access Synchronous Z, or Continuous Access Journal Z.
• When you change the processor blade ID of an LDEV, you should use Performance Monitor
before and after the change to check the load status of devices. Do not change several LDEV
processor blade IDs during a short period of time. As a guideline, you can change 10% or
less of the total number or the full workload of LDEV processor blade IDs assigned to the same
processor blade ID at the same time.
• After you change the processor blade ID of an LDEV, wait more than 30 minutes before you
try to change the ID again for the same LDEV.
Using a system disk
A system disk is a special LDEV used in the storage system for specific purposes. A system disk is
not required in a storage system, but is recommended for buffering of the audit log. A system disk
should not be used for storing user data. After a system disk is created, the system knows what
types of information the system disk is used for and all appropriate information is automatically
sent to the system disk.
For example, when the system disk is used as an audit log buffer, you set parameters to enable
the audit log buffer. The Audit Log feature recognizes the LDEV number of the system disk and then
accesses it as a buffer. The system disk must have sufficient capacity to accommodate the audit
log buffer. See the HP XP P9000 Audit Log User and Reference Guide for more information about
how to enable the audit log buffer.
To designate the system disk as the buffer area for audit logs, do one of the following:
• In the Audit Log Setting window, set Audit Log buffer to Enable.
• Set system option mode (SOM) 676 to ON.
52 Configuring custom-sized provisioning