
HP XP P9000 for Business Continuity Manager Software Reference Guide
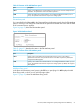
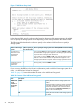

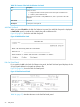
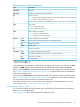
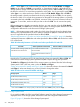

Figure 17 Add Route Entry Panel
In the selection field, specify a relevant value based on the status of the storage system to be added.
How to specify the storage system varies depending on the value specified in the selection field.
The following table describes the values to specify in the selection field and how to specify a
storage system.
How to specify the storage system to be added (DAD ID and serial number)Value to specify in
the selection field
Status of the storage
system
If you press the Enter key without specifying values for DADID and SN, a
list of selectable storage systems appears in the Storage System Selection
List panel. Select a storage system from the list.
1A Local Scan or
Remote Scan has
already been
performed.
If you specify a value for DADID or SN, a list of storage systems whose
DAD ID or serial number matches the specified value appears in the
Storage System Selection List panel. Select a storage system from the list.
Directly specify values for DADID and SN.2A Remote Scan has
not yet been
performed.
If you are using the F5 key in the Route List Information panel to add the first storage system for a
route, 1 is selected and cannot be changed.
Table 32 (page 52) lists and describes the items in the Add Route Entry panel.
Table 32 Contents of the Add Route Entry panel
DescriptionItem
Specify the DAD ID of the storage system to be
added.
DADIDDADID and
serial
Specify the DAD ID so that the number of characters
in the disk configuration definition file does not
number of
the storage
system
exceed 44 characters when combined with the
value specified for Configuration File Prefix (the
prefix) in the Set Defaults panel.
Specify the serial number of the storage system to
be added.
SN
52 ISPF panels