
HP XP P9000 Configuration Guide (AV400-96525, November 2012)

List All Volume Groups
Add a Volume Group
Set Characteristics of a Volume Group
List Contents of a Volume Group
Remove a Volume Group
Activate a Volume Group
Deactivate a Volume Group
Import a Volume Group
Export a Volume Group
Mirror a Volume Group *1
Unmirror a Volume Group *1
Synchronize LVM Mirrors *1
Back Up a Volume Group
Remake a Volume Group
List Files in a Volume Group Backup
Restore Files in a Volume Group Backup
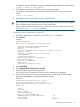
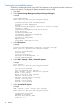
6. Enter or select values for the following fields:
Volume Group name (the volume group can contain multiple hdisk devices)
Physical partition size in megabytes, see “Physical partition size table” (page 129)
Physical Volume names
To enter values, place the cursor in the field and type the value.
To select values, place the cursor in the field and press F4.
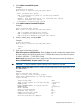
Example
Type or select values in entry fields.
Press Enter AFTER making all desired changes.
[Entry Fields]
VOLUME GROUP name [vg01]
Physical partition SIZE in megabytes 4
PHYSICAL VOLUME names [hdisk1]
Activate volume group AUTOMATICALLY yes
at system restart?
Volume Group MAJOR NUMBER []
7. Enter yes or no in the Activate volume group AUTOMATICALLY at system restart? field.
If you are not using HACMP (High Availability Cluster Multi-Processing) or HAGEO (High
Availability Geographic), enter yes.
If you are using HACMP and/or HAGEO, enter no.
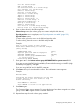
8. Press Enter when you have entered the values. The confirmation screen appears.
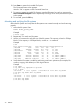
Example
ARE YOU SURE?
Continuing may delete information you may want
to keep. This is your last chance to stop
before continuing.
Press Enter to continue.
Press Cancel to return to the applications.
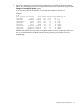
9. Press Enter again.
The Command Status screen appears. To ensure the devices have been assigned to a volume
group, wait for OK to appear on the Command Status line.
10. Repeat these steps for each volume group needed.
Configuring disk array devices 75