
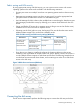
HP XP P9000 Configuration Guide (AV400-96525, November 2012)


Creating and formatting disk partitions
Dynamic Disk is supported with no restrictions for a disk array connected to a Windows
2000/2003/2008 system. For more information, see Microsoft's online help.
CAUTION: Do not partition or create a file system on a device that will be used as a raw device
(for example, some database applications use raw devices.)
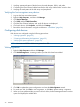
1. In the Disk Management main window, select the unallocated area for the SCSI disk you want
to partition.
2. Click the Action menu, and then click Create Partition to launch the New Partition Wizard.
Follow the Partition Wizard to create and format partitions and assign drive letters. Format
partitions with the following settings and format options.
File System: NTFS (enables Windows to write to the disk).
Allocation unit size: Default. Do not change this entry.
Volume label: Enter a volume label, or leave this field blank for no label.
Format Options: Click Perform a Quick Format to decrease the time required to format the
partition. Click Enable file and folder compression only if you want to enable compression.
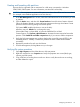
3. Verify the Disk Management main window displays the correct file system (NTFS) for the
formatted partition. “Healthy” indicates the partition has been created and formatted
successfully.
4. Repeat this procedure for each new disk device.
5. Exit Disk Management, clicking Yes to save your changes.
Verifying file system operations
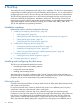
1. Open My Computer and check that the new disks are present.
2. Right-click each disk to view Properties and verify the properties are correct (label, type,
capacity, and file system).
3. Copy a file from an existing drive to each new drive to verify the new drives are working,
and then delete the copies.
Configuring disk devices 33