
HP P9000 Performance for Open and Mainframe Systems User Guide (AV400-96395, October 2011)


Launching Cache Residency
1. Log on to the primary SVP. When you successfully log on to the primary SVP, the Remote Web
Console main window opens.
2. On the menu bar of the Remote Web Console main window, click Actions→Other
function→Cache Residency.
3. In the Cache Residency window, click . Change the mode between the view mode and
modify mode.
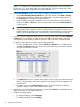
Viewing Cache Residency information
The Cache Residency information can be viewed in the following fields in the Cache Residency
window.
• CU:LDEV tree
• LDEV information table
• Cache information area
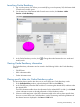
Placing specific data into Cache Residency cache
This procedure places specific data from one or more LDEVs into Cache Residency cache.
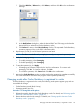
1. In the Cache Residency window, select the desired CLPR from the CLPR: list.
2. In the CU:LDEV tree, select the LDKC and the CU containing the desired LDEV, and then select
the desired LDEV.
The LDEV information table shows the information for the selected LDEV. A dash (-) in the Mode
column indicates an area not already allocated to Cache Residency cache.
3. Select an unallocated area in the LDEV information table as the area to place specific data
from one or more LDEVs into Cache Residency cache. The starting and ending addresses of
the selected area are displayed in the Start and End fields.
Launching Cache Residency 45