
HP P9000 Business Continuity Manager Reference Guide (T5253-96058, September 2011)
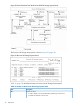


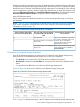
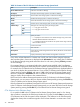
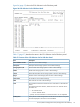
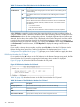
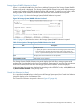
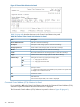
Table Of Contents
- P9000 for Business Continuity Manager Software Reference Guide
- Contents
- 1 ISPF Panels
- Overview of ISPF Panels
- Common Displays Among Panels
- Main Menu Panel
- Installation Verification Summary Panel (Environment Settings Verification)
- Set Defaults Panel (Prefix and DAD ID Settings)
- Manage Licenses Panel (License Management)
- Discover/Define Configuration Panel (Configuration File Definition)
- Discover HP Storage System Panel
- Scan Device Address Extent Panel
- CU Selection List for Remote Storage Array Panel
- CCA Selection List for Edit devn Panel
- Edit Device Number for CU Panel
- Storage System/DADID Selection List Panel
- Control Unit Selection List Panel
- Command Control Address (CCA) Selection List Panel
- Scan Remote Device Address Extent Panel
- Route Config Panel
- Add Route List ID Panel
- Route Information Panel
- Add Route Panel
- Add APID Panel
- Inner Route Information Panel
- Add Route Entry Panel
- Add Remote Route Entry Panel
- Storage System Selection List Panel
- Define Command Device Panel
- Sort the Define Command Device Panel
- Edit APID Panel
- Entire Route Information Panel
- Add Route Entry Panel
- Storage System/DAD Selection List Panel
- Insert Route Entry Panel
- Edit Route Entry Panel
- Edit Remote Route Entry Panel
- Insert Remote Route Entry Panel
- Path Set Selection List Panel
- Copy Group Selection List Panel
- Add Copy Group Panel
- Copy Group Detail Definition Panel
- Copy Group Attributes Panel
- Setting C/T ID Attributes Panel
- Copy Group Pair Detail Panel
- Pair Selection List (Primary) Panel
- Import SMS Storage Group Panel
- Import SMS Storage Group Result Panel
- Pair Selection List (Secondary) Panel
- Sort Copy Group Container Panel
- Sort Copy Group Pairs List Panel
- Scan Copy Pair Inside Storage System Panel
- Browse Copy Group Detail Definition Panel
- Browse Copy Group Pair Detail Panel
- Discover HP Storage System Panel
- Manage Route Panel (Route Management)
- Manage Path Set Panel (Logical Path Management)
- Manage Copy Groups Panel (Copy Group Operation)
- Sort the Copy Groups Panel
- Executing YKLOAD
- Copy Group Status Summary Panel (Executing YKQUERY)
- Copy Group Storage System Summary Panel
- CAA Copy Group Performance Statistics Panel
- Sort CAA Copy Group Statistics Panel
- CAJ Copy Group Performance Statistics Panel
- Sort CAJ Copy Group Statistics Panel
- Copy Group Pair Status Panel
- Sort the Copy Group Pairs Status Panel
- Volume Query Information (BC) Panel
- Volume Query Information (CA) Panel
- Volume Query Information (CAA) Panel
- Volume Query Information (CAJ) Panel
- Volume Query Information Panel (Executing YKQRYDEV)
- Executing YKMAKE
- Executing YKSUSPND
- Executing YKRESYNC
- Executing YKDELETE
- Executing YKWATCH
- Executing YKEWAIT
- Executing YKRECVER
- Path Set Status of Copy Group Pair Panel (YKQRYDEV with PATH Parameter Specified)
- Logical Path Status of Copy Group Pair Panel
- Confirmation Panels
- Confirm Execution Dissolve Panel
- Confirm Execution Recover Panel
- Confirm Command Device Build Panel
- Confirm Cancellation of Changes Panel
- Confirm Cancellation of Editing Panel
- Confirm Command Device Delete Panel
- Confirm Configuration File Delete Panel
- Confirm Configuration File Update Panel
- Confirm Copy Group Load Panel
- Confirm Overwrite ONLINE Target Volume Panel
- Confirm Path Delete Panel
- Confirm Path Set Load Panel
- Confirm Route Delete Panel
- Confirm Route List Edit Panel
- Confirm Retry of Configuration File Create Panel
- Confirm Open/MF Consistency Group Suspension Panel
- 2 CLI Commands
- Copy Types and Targets for Which Commands Can Be Executed
- List of Functions
- Configuration Files That Must Be Loaded Before Command Execution
- Command details
- YKBLDCMD Command
- YKBLDPTH Command
- YKCONMSG Command
- YKDELCMD Command
- YKDELETE Command
- YKDELPTH Command
- YKDROP Command
- YKENV Command
- YKERCODE Command
- YKEWAIT Command
- YKEXPORT Command
- YKFCSTAT Command
- YKFREEZE Command
- YKH2B Command
- YKIMPORT Command
- YKINSCHK Command
- YKLOAD Command
- YKMAKE Command
- YKQHPATH Command
- YKQRYDEV Command
- YKQRYPTH Command
- YKQUERY Command
- YKRECVER Command
- YKRESYNC Command
- YKRUN Command
- YKSCAN Command
- YKSLEEP Command
- YKSTATS Command
- YKSTORE Command
- YKSUSPND Command
- YKWATCH Command
- YKWTOMSG Command
- CLI Command Coding Examples
- 3 Data Objects
- Saving and Converting Objects
- Dataset Formats and Required Disk Capacity for the Configuration File
- XML Document Type Definitions
- Configuration File Examples
- About REXX Variable Structures
- REXX Variables Updated by YKQUERY and YKEWAIT Commands
- CSV Files Used by the Copy Group Definition File Generation Function
- 4 BCM Monitor Parameter Files
- 5 Support and other resources
- A Example of the Scan Results of PPRC Copy Pairs
- B Symbols Used in Syntax Explanations
- C Acronyms and Abbreviations
- Glossary
- Index
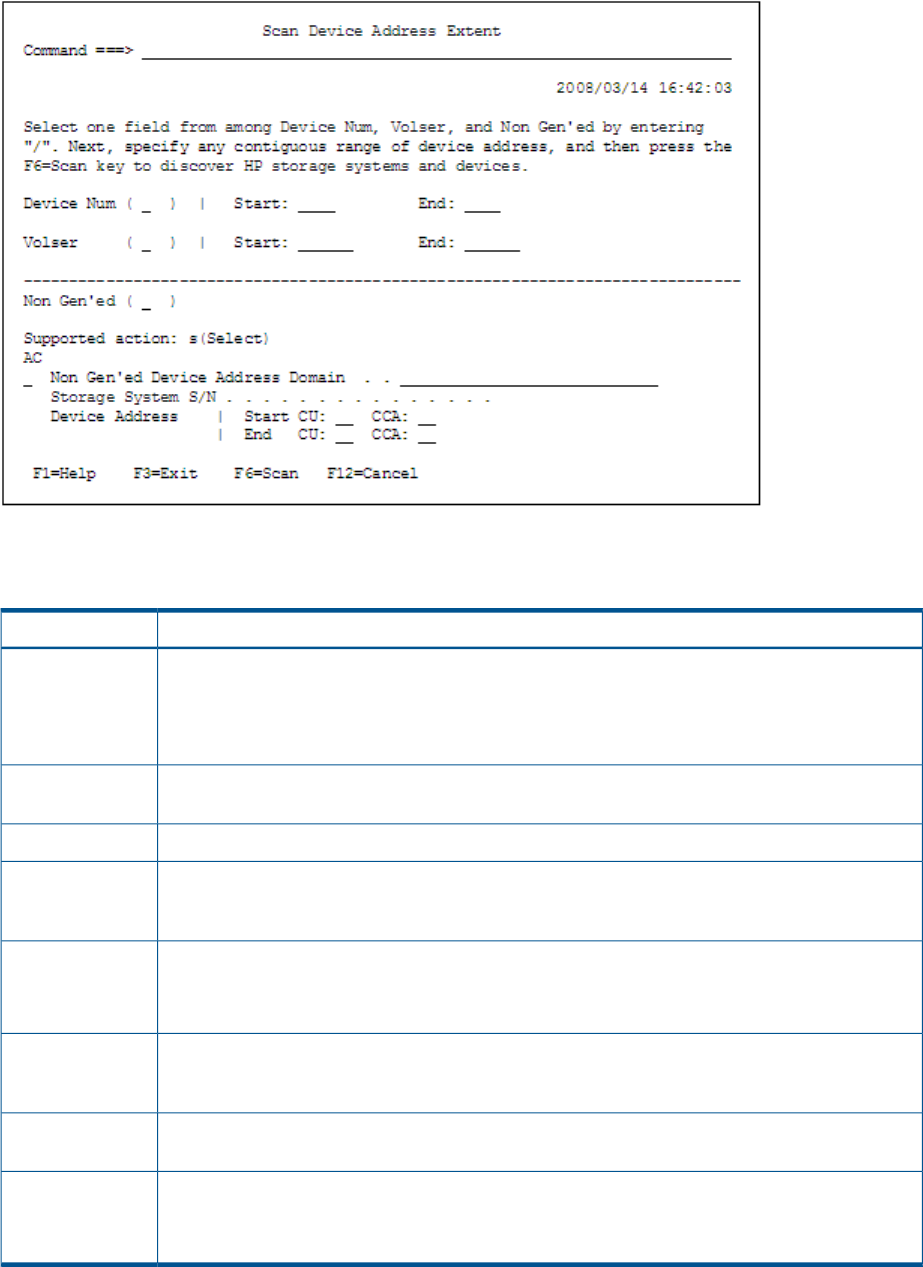
Figure 22 Scan Device Address Extent Panel
Table 14 (page 34) describes the items in the Scan Device Address Extent panel.
Table 14 Contents of the Scan Device Address Extent Panel
DescriptionItem
To scan device numbers, enter the check mark (/), and then specify the range of device numbers
to be scanned in Start and End. Enter device numbers in ascending order by hexadecimal number.
Device Num
NOTE: The device number range cannot be omitted. To scan only one volume, specify the same
value for both Start and End.
To scan volume serial numbers, add a check (/), and then specify the range of the volume serial
numbers to be scanned in Start and End. Order by EBCDIC code.
Volser
Displays the number of volumes detected by a local scan.XXXXX...X
When the target is a Non Gen'ed volume, add a check mark (/) and specify the following
information: DAD ID to which the storage system to be scanned belongs, the serial number, and
the range of device addresses.
Non Gen’ed
Specify an action.
• s: Specify this option to select a DAD ID that has been NG-scanned and a storage system serial
number. The “Storage System/DADID Selection List Panel” (page 39) is displayed.
AC
DAD ID to which the storage system to be scanned belongs.Non Gen’ed
Device Address
Domain
Serial number of the storage system to be scanned.Storage System
S/N
Specify the Start and End of the device address (CU and CCA) range to be scanned.
Specify the hexadecimal number in ascending order. If the CCA is omitted, the Start and End will
be set to 00 and FF respectively.
Device Address
When the F6=Scan key is pressed after the items in Table 14 (page 34) are specified, volumes
are scanned within the specified range. If an invalid character is specified, or if the value specified
for Start is greater than the value specified for End, an error message prompts you to re-enter the
values.
34 ISPF Panels