
HP StorageWorks P9000 Performance Advisor Software v5.4 Install Guide (T1789-96330, April 2012)
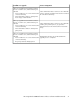

Resolving validity, connectivity, and GUID configuration errors after installation
To resolve the validity and connectivity issues after the Windows host agent installation, complete the
following:
• Provide a valid DNS or IP address, and HTTP port number:
1. Open the paxp_service.properties file from the <Installation_Drive>:\Program
Files\Hewlett-Packard\xppa\hostagent\config folder on your host system. If it
is a custom install location, the file is available in the <Installation_Drive>:\<Install-
ation_Directory>\hostagent\config folder.
2. Edit the following fields based on which one has an incorrect entry:
• ManagementStation.Hostname=<fully qualified domain name or IP
address>, where you provide a valid DNS or IP address.
• http.port, where you provide the port number of the management station with which
your Windows host agent should communicate.
3. Restart the Windows host agent services. For more information, see Appendix B.
• Check whether a command device is created and presented to the host. For more information,
see “Creating and assigning command devices to host agents” on page 36.
• Check whether the Windows GUID (\\?\Volume{GUID}) is created and assigned to command
devices on the Windows host. For more information, see “Assigning GUIDs for command devices
on a Windows host agent” on page 86.
Selecting complete or custom installation method
Use either of the following methods to install the P9000 Performance Advisor host agents:
• Complete installation method: Requires at least 2.5 GB of free disk space on your <Win-
dows_Volume>. In this installation method, the real-time component is also installed on the host
along with the host agent files. It enables the host agent to collect real-time data from the XP and
the P9000 disk arrays and provide that data to P9000 Performance Advisor.
If you decide to install the real-time component later, modify your Windows host agents settings
by executing the setup.exe file and selecting Modify as the Maintenance Setup Type. For more
information, see Modifying P9000 Performance Advisor Windows host agent program fea-
tures on page 118.
• Custom installation method: In this installation method, you can install the real-time component
based on whether you want to view real-time data for your XP and P9000 disk arrays. By default,
the real-time component is installed on your host. If you decide to install the real-time component
later, start the P9000 Performance Advisor setup.exe file and select Modify from the list of
maintenance setup types displayed. For more information, see Modifying P9000 Performance
Advisor Windows host agent program features on page 118.
Select the installation method as complete or custom based on your requirement, and click Next to
proceed.
• If you select the complete installation method, the Ready to Install window appears. For more in-
formation, see “Completing the Windows host agent installation and next steps” on page 79.
• If you select the custom installation method, the Custom Setup installation window appears.
In the list of program features that can be installed, the P9000 PA Host Agent program feature is
installed by default. You have the option of only choosing the real-time component. So, based on
whether you want to install the real-time service on your host, do the following:
1. Click the + sign or the down arrow beside the P9000 PA Host Agent menu to view the P9000
Performance Advisor host agents for the following operating platforms:
Installing the P9000 Performance Advisor host agents78