HP StorageWorks XP24000/XP20000 Volume Security User's Guide Abstract This document describes and provides instructions for configuring and performing Volume Security operations on the HP storage system.
Legal and notice information © Copyright 2008-2009 Hewlett-Packard Development Company, L.P. Confidential computer software. Valid license from HP required for possession, use or copying. Consistent with FAR 12.211 and 12.212, Commercial Computer Software, Computer Software Documentation, and Technical Data for Commercial Items are licensed to the U.S. Government under vendor's standard commercial license. The information contained herein is subject to change without notice.
Contents 1 Overview of Volume Security ............................................................... 7 Overview ................................................................................................................................... 7 Terminology ............................................................................................................................... 7 2 About Volume Security Operations .......................................................
Locating Ports through Which Hosts Can Access Volumes ........................................................ Locating Security Groups that Contain a Specified Volume ....................................................... Locating Hosts in a Security Group that Contains a Specified Volume ........................................ Locating Security Groups that Contain a Specified Host Group ................................................. Locating Security Groups that Contain a Specified LDEV Group .......
Figures 1 Security Example 1 ................................................................................................. 10 2 Security Example 2 ................................................................................................. 11 3 Security Example 3 ................................................................................................. 12 4 The Volume Security Window ...................................................................................
Tables 1 Acronyms and Abbreviations ....................................................................................
1 Overview of Volume Security Unless otherwise specified, the term storage system in this guide refers to the following disk arrays: • • • • HP HP HP HP StorageWorks StorageWorks StorageWorks StorageWorks XP24000 Disk Array XP20000 Disk Array XP12000 Disk Array XP10000 Disk Array The GUI illustrations in this guide were created using a Windows computer with the Internet Explorer browser. Actual windows may differ depending on the operating system and browser used.
referred to as S-VOLs, or source volumes. Secondary volumes are often referred to as T-VOLs, or target volumes.
2 About Volume Security Operations Overview of Volume Security Functions The Volume Security feature protects data in your storage system from I/O operations performed at mainframe hosts. Volume Security enables you to apply security to volumes so that the specified mainframe hosts will be unable to read from and write to the specified volumes. Volume Security also enables you to prevent data on volumes from being overwritten by erroneous copy operations.
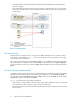
• The volume ldev4 is accessible only from host4 because ldev4 and host4 are registered in the same access group. • The volume ldev5 does not belong to any access groups. For this reason, hosts in access groups cannot access ldev5. ldev5 is only accessible from host5 and host6, which are not registered in access groups. Figure 1 Security Example 1 Port-Level Security Usually, hosts are connected to two or more ports via cables and have access to volumes via these ports.
Figure 2 Security Example 2 If no ports are registered in a host group, hosts in the host group can access volumes via ports to which the hosts are connected. This manual uses the term port-level security, which is a security policy for enabling hosts to access volumes only via ports registered in host groups and thus prohibiting hosts to access the volumes via other ports. CAUTION: Before you apply security, you should confirm what hosts are performing I/O operations on volumes in access groups.
volumes (vol_A and vol_B) in a pool group, all the mainframe hosts connected to your storage system will be unable to access vol_A and vol_B. To register volumes in a pool group, you must create an LDEV group, register the volumes in the LDEV group, and then register the LDEV group in the desired pool group. Any pool group can only contain one LDEV group. In Figure 3, a pool group is created.
When applying security, make sure that your security settings are correct. If incorrect security settings are made, the system will be difficult or impossible to control. If the CPU of a mainframe host is upgraded after you apply security settings, you must execute the system command D M=CPU at the mainframe host to obtain the latest information about the host.
• 3390-9, 3390-9A, 3390-9B, 3390-9C • 3390-L, 3390-LA, 3390-LB, 3390-LC • 3390-M, 3390-MA, 3390-MB, 3390-MC • PCB types: Volume Security supports the following PCB types: • ESCON or ACONARC • FICON or FIBARC Maximum Possible Number of Groups Volume Security enables you to create up to 128 security groups per storage system, and up to 64 security groups per LDKC. Security groups are classified into access groups and pool groups: • One access group can contain only one host group and one LDEV group.
3 Using the Volume Security GUI This chapter explains Volume Security window and dialog boxes. The Volume Security Window The Volume Security window (Figure 4) appears when you start Volume Security. This window is the starting point for all the Volume Security operations. To start the Volume Security software: 1. Log on to the disk array to open the Remote Web Console main window. For details, see the HP StorageWorks XP24000/XP20000 Remote Web Console User’s Guide. 2.
Figure 4 The Volume Security Window Item Description Security Group tree Displays the security, host, and LDEV groups assigned to each LDKC defined on the storage system. For details see “Security Group Tree ” on page 16. Hosts table Displays the type, model, SEQNUMBER, Logical Partition (LPAR) and vendor of each host. For details, see “Hosts Table” on page 18. CU list Allows you to select the desired command unit(s) available in each group.
• Double-click Security Group and a list of security groups appears. Then select a host group or LDEV group in that security group. • Double-click Host Group and a list of host groups appears. Then select a specific host group. • Double-click LDEV Group. The tree view shows the host group and/or LDEV group registered in the security group. Figure 5 Security Group Tree Icon Description Indicates an access group whose volumes can be used as secondary volumes (i.e.
Icon Description Indicates that the security settings in this security group are currently disabled. If you enable the security settings, this security group is classified as an access group. Also, volumes in this security group can be used as secondary volumes (i.e., copy destination volumes) for copy operations. Indicates that the security settings in this security group are currently disabled. If you enable the security settings, this security group will be classified as an access group.
Figure 6 Hosts Table Column Description No. A sequential number associated with a host (or channel extender). Type/Model Type and model number of a host (or a channel extender). SEQNUMBER Node ID of a host (or a channel extender). LPAR The logical partition number of a host. Vendor The host vendor. Vendors include FJT (Fujitsu), IBM, HTC (Hitachi), and CNT(Ex). If CNT(Ex) appears, the table row indicates the type, model number, and node ID of a channel extender.
Figure 7 LDEV table Column Description The volume ID (in hexadecimal from 00 to FF) NOTE: LDEV A volume ID ending in # (for example, 00#) indicates , the volume is an external volume. Emulation The emulation type of the volume The volume status: Attribute • An asterisk (*) denotes a secondary volume (copy destination) for USP V/VM copy software. • A plus symbol (+) denotes that one or more LU paths are assigned to the volume.
Figure 8 The Add/Change Security Group Dialog Box Item Description LDKC Indicates the selected LDKC number. Descriptive information about the security groups in the LDKC. • Security indicates whether the security settings in the security group are Enabled or Disabled. CAUTION: It is possible that security settings are disabled even if Enabled is displayed.
Item Description When creating a new security group, you enter the name of the security group in this Enter Security Group text box. When renaming an existing security group, you select the security group in the Security Group List table and then enter a new name. The following conventions apply to security group names: Enter Security Group • Up to eight characters can be used. • Characters are case-sensitive.
Item Description Change When settings of the selected security groups are changed, click Change to make the changes appear in the Security Group List table. Applies settings in the Add/Change Security Group dialog box to the Volume Security window, and then closes the dialog box. CAUTION: OK Clicking OK applies the settings to the Volume Security window, but does not apply the settings to the storage system.
Figure 9 The Add/Change Host Group Dialog Box Item Description LDKC Indicates the selected LDKC number. Host Group List A list of host groups in the LDKC. When creating a new host group, you enter the name of the host group in this Enter Host Group text box. When renaming an existing host group, you select the host group in the Host Group List table and then enter a new name. The following conventions apply to host group names: Enter Host Group • Up to eight characters can be used.
Item Description This button applies settings in the Add/Change Host Group dialog box to the Volume Security window, and then closes the Add/Change Host Group dialog box. OK Cancel CAUTION: The OK button applies the settings to the Volume Security window, but does not apply the settings to the storage system. To apply the settings to the subsystem, you must continue to click Apply in the Volume Security window.
Figure 10 The Add/Change LDEV Group Dialog Box Item Description LDKC Indicates the number of the selected LDKC. LDEV Group List A list of LDEV groups in the LDKC. When creating a new LDEV group, you enter the name of the LDEV group in this Enter LDEV Group text box. When renaming an existing LDEV group, you select the LDEV group in the LDEV Group List table and then enter a new name. The following conventions apply to LDEV group names: Enter LDEV Group • Up to eight characters can be used.
Item Description This button applies settings in the Add/Change LDEV Group dialog box to the Volume Security window, and then closes the Add/Change LDEV Group dialog box. OK Cancel CAUTION: The OK button applies the settings to the Volume Security window, but does not apply the settings to the storage system. To apply the settings to the subsystem, you must continue to click Apply in the Volume Security window.
Item Description Host Group List Specify the name of the host group in which hosts will be registered. Host information. • No. A sequential number associated with a host. NOTE: Each table row usually shows information about a host. However, if a host is attached to the storage system via a channel extender, the table row shows information about the channel extender. • Type/Model indicates the type and the model number of a host (or a channel extender). The type appears on the left of the slash (/).
Item Description Applies settings in the Add/Change Host dialog box to the Volume Security window, and then closes the dialog box. CAUTION: OK Clicking OK applies the settings to the Volume Security window, but does not apply the settings to the storage system. To apply the security settings to the storage system, you must continue to click Apply in the Volume Security window until they appear in the dialog box.
Item Description Lists volumes registered in the LDEV group. One table row indicates one volume. • The LDEV column indicates LDEV numbers. NOTE: Registered in LDEV Group table If a volume ID is displayed with a pound sign (for example, 00#), the volume is an external volume. • The Emulation column indicates emulation types of volumes.
Figure 13 The Select Port Dialog Box Item Description LDKC Indicates the number of the selected LDKC Host Group Specifies a host group in which ports will be registered. Shows the registered ports in the host group: • LDEV displays the LDEV numbers. Registered Port table NOTE: When the dialog box opens for the first time, the Port list does not display ports. This means that hosts in the host group can access volumes via every port displayed in the Port list in the Unregistered port box.
Item Description Applies settings in the Select Port dialog box to the Volume Security window, and then closes the Select Port dialog box. CAUTION: OK Clicking OK applies the settings to the Volume Security window, but does not apply the settings to the storage system. To apply the security settings to the subsystem, you must continue to click Apply in the Volume Security window until they appear in the dialog box. Cancel Discards settings in the Select Port dialog box, and then closes the dialog box.
Item Description Cancel Discards settings in the Specify Security Group dialog box and closes the dialog box. The Host to Security Group Dialog Box The Host to Security Group dialog box (Figure 15) appears when you do either of the following in the Volume Security window (Figure 4): • when you right-click a host from the upper-right table and then select Host to Security Group from the pop-up menu.
Item Description Provides information about a host, where the number groups, from left to right, indicate: • First: The Type/Model the type and model number of a host (or a channel extender). • Second: The Node ID of a host (or a channel extender). Host • Third: The Logical Partition Number of the host. • Fourth: The vendor of the host. Vendors include: FJT (Fujitsu), IBM, HTC (Hitachi), and CNT(Ex). If CNT(Ex) appears, the table row indicates the type, model number, and node ID of a channel extender.
Figure 16 The Host to LDEV Dialog Box Item Description LDKC Indicates the number of the selected LDKC Provides information about a host, where the number groups, from left to right, indicate: • First: The Type/Model the type and model number of a host (or a channel extender). • Second: The Node ID of a host (or a channel extender). Host • Third: The Logical Partition Number of the host. • Fourth: The vendor of the host. Vendors include FJT (Fujitsu), IBM, HTC (Hitachi), and CNT(Ex).
Figure 17 The Host Group to Security Group Dialog Box Item Description LDKC Indicates the number of the selected LDKC Host Group Specifies a host group. Lists information about the security groups in which the specified host group is registered. • Security Group indicates the name of a security group. • Security indicates whether the security settings in the security group are enabled or disabled.
Figure 18 The Host Group to Port Dialog Box Item Description LDKC Indicates the number of the selected LDKC. Provides information about a host group, where the number groups, from left to right, indicate: • First: The Type/Model the type and model number of a host (or a channel extender). Host Group • Second: The Node ID of a host (or a channel extender). • Third: The Logical Partition Number of the host. • Fourth: The vendor of the host. Vendors include FJT (Fujitsu), IBM, HTC (Hitachi), and CNT(Ex).
Figure 19 The LDEV to Security Group Dialog Box Item Description LDKC Indicates the number of the selected LDKC. CU Specifies a CU image number. Describes the available LDEVs: • LDEV indicates a number assigned to the LDEV. • Emulation indicates the emulation types of the volume. LDEV table NOTE: A volume ID ending in # (for example, 00#) indicates the volume is an external volume.
• when you right-click an item in the tree view and then select List -> LDEV to Host from the pop-up menu. The List ->LDEV to Host pop-up command does not display if you double-click a security group and then right-click a host group or LDEV group from immediately below the security group.
Item Description Lists hosts in the security group in which the specified volume is registered. • No. A sequential number associated with a host. NOTE: Each table row usually shows information about a host. However, if a host is attached to the disk subsystem via a channel extender, the table row shows information about the channel extender. Host table • Type/Model indicates the type and the model number of a host (or a channel extender). The Type appears on the left of the slash (/).
Figure 21 The LDEV Group to Security Group Dialog Box Item Description LDKC Indicates the number of the selected LDKC. LDEV Group Specifies an LDEV group. Lists information about the security groups in which the specified LDEV group is registered. • Security Group indicates the name of a security group. Security Group table • Security indicates whether the security settings in the security group are enabled or disabled. • Group Status indicates whether the security group is an Access or a Pool group.
Figure 22 The Error Detail Dialog Box Item Description Host Lists the number of the host available on the selected LDKC which are performing I/O operations. LDKC Indicates the number of the selected LDKC. CU Specifies a Command Unit image and forces the display of any volumes on which the host is performing I/O operations and which belong to the specified CU image. Provides information about the selected CU. LDEV table • LDEV: The available LDEV numbers. • Emulation: The emulation types of volumes.
4 Performing Volume Security Operations This chapter explains the following Volume Security operations: • Launching Volume Security (see Launching Volume Security, page 43) • Viewing Security Settings (see Viewing Security Settings, page 43) • Enabling only the specified hosts to access certain volumes, so that the other hosts cannot access the volumes (see Limiting Host Access, page 47) • Preventing all the hosts to access volumes (see Prohibiting Host Access, page 53).
• Locating Ports through Which Hosts Can Access Volumes (see “Locating Ports through Which Hosts Can Access Volumes” on page 45) • Locating Security Groups that Contain a Specified Volume (see “Locating Security Groups that Contain a Specified Volume” on page 45) • Locating Hosts in a Security Group that Contains a Specified Volume (see “Locating Hosts in a Security Group that Contains a Specified Volume” on page 46) • Locating Security Groups that Contain a Specified Host Group (see “Locating Security Grou
The Host to LDEV dialog box appears (Figure 16). The dialog box displays a list of volumes. 3. Right-click an arrow at the right end of the CU drop-down list, and then see how many CU image numbers appear. • If only one CU image number appears, the table in the dialog box displays all the volumes that you want. • If two or more CU image numbers appear, the table in the dialog box currently displays some of the volumes that you want. Select each CU image number to find volumes in the specified CU image.
2. From the pop-up menu, select List -> LDEV to Security Group. The LDEV to Security Group dialog box appears (Figure 19). The table on the right displays the security groups that you want. If the desired volume is not displayed in the lower-right table: 1. 2. 3. In the tree view of the Volume Security window (Figure 4), right-click an item except for a host group or LDEV group that appears immediately below a security group. From the pop-up menu, select List -> LDEV to Security Group.
Locating Security Groups that Contain a Specified LDEV Group To specify an LDEV group and then find security groups in which the specified LDEV group is registered, follow the procedure below: 1. 2. 3. In the tree view of the Volume Security window (Figure 4), right-click an item except for a host group or LDEV group that appears immediately below a security group. From the pop-up menu, select List -> LDEV Group to Security Group. The LDEV Group to Security Group dialog box appears (Figure 21).
The Add/Change Host Group dialog box (Figure 9) appears. 5. In the Enter Host Group box, enter the name of the host group that you want to create, and then click the Add button. NOTE: Host group names can be up to eight characters and are case-sensitive. The first character and the last character must not be a space. Also, the following characters are unusable in host group names: \,/:;*?"<>| 6. Confirm that the new host group is displayed by blue in Host Group List, and then click OK.
If no ports are registered in the displayed host group, you can register the following hosts: • hosts that do not belong to any host group • hosts belonging to host groups in which no ports are registered However, you cannot register hosts belonging to host groups in which ports are registered. 6. Select Registration and then Register Host in Host Group from the pop-up menu. The specified hosts are displayed by blue and also indicated by the 7. icon or the icon.
If hosts registered in the host group are also registered in another host group, you cannot register ports in the Port list in the Registered port box, and thus you cannot implement port-level security. 6. Click OK in the Select Port dialog box. The Select Port dialog box closes and you are returned to the Volume Security window. CAUTION: Here, the settings in the window have not been applied to the storage system. 7. Click Apply in the Volume Security window (Figure 4).
CAUTION: Here, the settings in the window have not been applied to the storage system. 7. Click Apply in the Volume Security window (Figure 4). A message appears and asks if you want to apply the settings to the storage system. 8. Click Yes. The settings are applied to the storage system. Registering Volumes in an LDEV Group Now that you have created an LDEV group, then you need to register volumes in the LDEV group.
A message appears and asks if you want to apply the settings to the storage system. 10. Click Yes. The settings are applied to the storage system. Creating a Security Group for Use As an Access Group To make security settings, you must create security groups. Security groups can be classified as access groups or pool groups. You must classify a security group as an access group if you want to allow volumes to be accessed only by specified hosts.
Registering a Host Group and an LDEV Group in a Security Group Now that you have classified your security group as an access group, your next (and the last) task is to register your host group and LDEV group into the security group. When you finish registration, the volumes in the LDEV group are secured and can only be accessed by hosts in the host group. Other hosts cannot access the volumes. To register a host group and an LDEV group into a security group: 1. 2. 3. Ensure that you are in Modify mode.
The following procedure explains how to create an LDEV group. For details on how to register volumes in an LDEV group, see “Registering Volumes in an LDEV Group” on page 54. CAUTION: When creating an LDEV group, you are strongly recommended to click the Apply button in the Volume Security window, as described in the last step of the following procedure.
CAUTION: When registering volumes in an LDEV group, you are strongly recommended to click the Apply button in the Volume Security window, as described in the last step of the following procedure. If you forget to click Apply, the volumes might be unregistered when you encounter an error registering the LDEV group (see “Registering an LDEV Group in a Security Group” on page 56). To register volumes in an LDEV group: 1. 2. 3. Ensure that you are in Modify mode.
4. Select Add/Change from the pop-up menu. The Add/Change Security Group dialog box (Figure 8) appears. 5. In the Enter Security Group box, enter the name of the security group that you want to create. NOTE: Security group names can be up to eight characters and are case-sensitive. The first character and the last character must not be a space. Also, the following characters are unusable in security group names: \,/:;*?"<>| 6. 7. 8. In In In • the Security box, select Enable.
5. 6. 7. 8. Use the Select Security Group drop-down list to select a security group in which you want to register an LDEV group. Use the LDEV Group drop-down list to select an LDEV group that you want to register in the security group, and then click OK. Click Apply in the Volume Security window (Figure 4). A message appears and asks if you want to apply the settings to the storage system. Click Yes. The settings are applied to the storage system.
TIP: To make volumes in your security group usable as secondary volumes (that is, copy destination volumes) for copy operations, you must select the security group in the Add/Change Security Group dialog box (Figure 8) and then select Enable in the T-VOL/R-VOL box. Next, click Change and then OK. Finally, click Apply in the Volume Security window (Figure 4).
Editing Security Groups This section explains the following operations, which allow you to edit your security groups: • Unregistering a host group from a security group (see “Unregistering a Host Group” on page 59) • Unregistering an LDEV group from a security group (see “Unregistering an LDEV Group” on page 59) • Renaming a security group (see “Renaming Security Groups” on page 60).
CAUTION: Here, the changes in the window have not been applied to the storage system. 6. Click Apply in the Volume Security window (Figure 4). A message appears and asks if you want to apply the changes to the storage system. 7. Click Yes. The changes are applied to the storage system. Renaming Security Groups To rename a security group, take the following steps: To rename a security group: 1. 2. Ensure that you are in Modify mode. In the Volume Security window (Figure 4), double-click an LDKC number.
Deleting Security Groups To delete a security group, take the following steps: To delete a security group: 1. 2. 3. Ensure that you are in Modify mode. In the Volume Security window (Figure 4), double-click an LDKC number. Do either of the following: • Right-click a security group in the tree view. • Right-click Security Group in the tree view and then select Add/Change from the pop-up menu.
D M=CPU This command displays the type, the model number, the node ID and the logical partition number of the host. Write down the information on a paper so that you will not forget it. For details on the system command, see the documentation for system commands. 2. 3. 4. 5. Ensure that you are in Modify mode. In the Volume Security window (Figure 4), double-click an LDKC number. Right-click Host Group to display a list of host groups. Right-click the host group in which you want to register the host.
3. Right-click a host group. A pop-up menu appears. 4. Select Specify and then Host from the pop-up menu. The Add/Change Host dialog box (Figure 11) appears and displays a list of hosts. The icons and 5. 6. indicate hosts registered in the specified host group. Select and then right click one or more hosts (indicated by or ) that you want to delete. Select Registration and then Unregister Host from Host Group from the pop-up menu. The specified hosts are displayed by blue.
CAUTION: Here, the settings in the window have not been applied to the storage system. 7. Click Apply in the Volume Security window (Figure 4). A message appears and asks if you want to apply the settings to the storage system. 8. Click Yes. The settings are applied to the storage system. Renaming Host Groups To rename a host group, take the following steps: To rename a host group: 1. 2. Ensure that you are in Modify mode. In the Volume Security window (Figure 4), double-click an LDKC number. 3.
Deleting Host Groups To delete a host group, take the following steps. To delete a host group: 1. 2. 3. Ensure that you are in Modify mode. In the Volume Security window (Figure 4), double-click an LDKC number. Do either of the following: • Right-click a host group in the tree view. • Right-click Host Group in the tree view and then select Add/Change from the pop-up menu.
The two boxes below the drop-down list displays volumes in the specified CU image. • The Registered in LDEV group box displays volumes registered in the LDEV group. • The Not registered in LDEV group box displays volumes that are not registered in the LDEV group. 6. In the Registered in LDEV group box, select volumes that you want to delete. Then, click the Not regist button. The selected volumes move to the Not registered in LDEV group box. 7. 8. To delete volumes in other CU images, return to step 5.
CAUTION: Here, the change in the window has not been applied to the storage system. 9. Click Apply in the Volume Security window (Figure 4). A message appears and asks if you want to apply the change to the storage system. 10. Click Yes. The change is applied to the storage system. Deleting LDEV Groups To delete an LDEV group, take the following steps. To delete an LDEV group: 1. 2. Ensure that you are in Modify mode. In the Volume Security window (Figure 4), double-click an LDKC number. 3.
Performing Volume Security Operations
5 Troubleshooting Troubleshooting Volume Security The Error Detail dialog box (Figure 22) may appear when you attempt to apply security settings. The probable causes of the error are: • Some hosts in one security group are accessing volumes in another security group. • Some hosts do not belong to any security group, but the hosts are accessing volumes in a security group. To remove this error, you must find the hosts and the volumes that cause the error. To find them, take the following steps: 1.
• The content of any error message(s) displayed on the Remote Web Console computer. • The Storage Navigator configuration information (use the FD Dump Tool). • The service information messages (SIMs), including reference codes and severity levels, displayed by the Remote Web Console computer. • The Volume Security (or other) error code(s) displayed on the Remote Web Console computer. • The exact content of any error messages displayed on the host system(s).
6 Support and Other Resources Related Documentation • HP StorageWorks XP24000/XP20000 Disk Array Owner's Guide • Hitachi ShadowImage™ for Mainframe User's Guide • Hitachi TrueCopy™ for Mainframe User's Guide You can find these documents on the HP Manuals website: http://www.hp.com/support/manuals In the Storage section, click Storage Software and then select a product.
• Error messages • Operating system type and revision level • Detailed questions Subscription Service HP recommends that you register your product at the Subscriber’s Choice for Business website: http://www.hp.com/go/e-updates After registering, you will receive email notification of product enhancements, new driver versions, firmware updates, and other product resources. HP Websites For additional information, see the following HP websites: • http://www.hp.com • http://www.hp.com/go/storage • http://www.
A Acronyms and Abbreviations Table 1 Acronyms and Abbreviations LDEV logical device LDKC logical disk controller M-VOL main volume MVS Multiple Virtual Storage (IBM) PC personal computer PCB printed circuit board R-SIM remote service information message R-VOL remote volume SI HP StorageWorks XP Business Copy Software SIM service information message SIz ShadowImage for Mainframe SVP service processor TC HP StorageWorks XP Continuous Access Software TCz TrueCopy for Mainframe TCzA
Acronyms and Abbreviations
Index G A access group, 9 Add/Change Host dialog box, 27 Add/Change Host Group dialog box, 24 Add/Change LDEV Group dialog box, 26 Add/Change Security Group dialog box, 21 C conventions storage capacity values, 71 D device emulation types, 13 dialog boxes Add/Change Host dialog box, 27 Add/Change Host Group dialog box, 24 Add/Change LDEV Group dialog box, 26 Add/Change Security Group dialog box, 21 Error Detail dialog box, 42 Host Group to Port dialog box, 37 Host Group to Security Group dialog box, 36 H
P W pool group, 11 port-level security overview, 10 websites HP, 72 HP Subscriber's Choice for Business, 72 product manuals, 71 windows Volume Security window, 16 R R-VOL, 12 related documentation, 71 S secondary volume, 12 Security disabling, 58 policy, 7 security enabling the specified hosts to access volumes, 47 example, 10, 11, 12 prohibiting all hosts from accessing LDEVs, 53 protecting volumes from copy operations, 57 security group classifying as a pool group, 55 classifying as an access group,