HP StorageWorks XP24000/XP20000 Cache Residency Manager User Guide Abstract This document describes and provides instructions for using the Cache Residency Manager features of the HP storage system.
© Copyright 2007, 2011 Hewlett-Packard Development Company, L.P. Confidential computer software. Valid license from HP required for possession, use or copying. Consistent with FAR 12.211 and 12.212, Commercial Computer Software, Computer Software Documentation, and Technical Data for Commercial Items are licensed to the U.S. Government under vendor's standard commercial license. The information contained herein is subject to change without notice.
Contents 1 Overview of HP StorageWorks XP Cache Residency Manager..........................5 2 About Cache Residency Manager Operations................................................6 Pre-staging Specific Data...........................................................................................................6 Cache Residency Modes...........................................................................................................7 Priority Mode..................................................
Conventions for Storage Capacity Values...................................................................................47 HP Technical Support..............................................................................................................47 Subscription Service................................................................................................................48 HP Websites............................................................................................................
1 Overview of HP StorageWorks XP Cache Residency Manager This chapter provides an overview of Cache Residency Manager functions and operations. The Cache Residency Manager (shortened to Cache Residency hereafter where applicable) feature of the storage system allows you to store frequently accessed data in a specific area of the storage system’s cache memory. Cache Residency increases the data access speed for the cache-resident data by enabling read and write I/Os to be performed at high speed.
2 About Cache Residency Manager Operations This chapter describes and provides instructions for Cache Residency operations using the licensed storage system HP Remote Console — Remote Web Console software. The Remote Web Console software communicates directly with the storage systems via a LAN. The Remote Web Console software displays detailed Cache Residency information and allows you to configure and perform Cache Residency operations for the data stored on the storage system.
on storage systems configured with at least 512 MB of cache. Your HP service representative configures the maximum allowable Cache Residency area when the cache is installed.
priority mode, write operations do not have to wait for available cache segments, and there will be no backend contention caused by destaging data. Table 2 Bind Mode Cache Residency Cache Requirements System Type RAID Level or Volume Type Capacity Specifications OPEN Systems RAID 5 (3390) or RAID 6 Slot capacity: 264 KB Cache Residency Cache Requirement 3 times the space required for user data: 1 slot = 3 x Cache segment capacity: 16.
Pre-staging occurs under any of the following circumstances: • When pre-staging is performed from the SVP or from Remote Web Console. • When the power is turned on. • When cache maintenance is performed. Notes: • If you have accessed the Cache Residency area for input and output before the pre-staging operation is performed from the SVP or Remote Web Console, the host may not be able to find data in the cache at the first I/O access after Cache Residency is configured.
3 Preparing for Cache Residency Manager Operations This chapter describes the system and installation requirements for Cache Residency Manager. It also details how to calculate cache size and how to enable the software.
For instructions on using the storage system Remote Web Console software and enabling the option, see the HP StorageWorks XP24000/XP20000 Remote Web Console User Guide. Note: When you use Remote Web Console on UNIX workstations or in other non-Windows environments, certain additional operating conventions must be followed. For details, see the HP StorageWorks XP24000/XP20000 Remote Web Console User Guide.
user data to use Cache Residency. However, RAID-5 or RAID-6 subsystems require three times the cache size. Note: If external volumes are used, twice the cache size for the user data is required to use Cache Residency. If the priority mode or the bind mode is set, the cache size is calculated assuming that one slot has the following values. • • For open-systems volumes: ◦ For OPEN-V, one slot is 264 KB (512 LBAs). ◦ For other than OPEN-V, one slot is 66 KB (128 LBAs).
Setting value of starting address (LBA) is the value which is input in the Cache Residency window. • Ending value = (↓Setting value of ending address (LBA) ÷ 512↓) Round down the value that is calculated from the formula between the two downward arrows (↓) after the decimal point. Setting value of ending address (LBA) is the value which is input in the Cache Residency window. b.
a. Where the bind mode is set: For RAID-1: • Required cache size = Number of addresses x (512 + 16) x 2 ÷ 1,024 The unit is KB. For RAID type other than RAID-1: • Required cache size = Number of addresses x (512 + 16) x 3 ÷ 1,024 The unit is KB. b. Where the priority mode is set: • Required cache size = Number of addresses x (512 + 16) ÷ 1,024 The unit is KB.
Setting value of ending address (CC) and Setting value of ending address (HH) is the value which is input in the Cache Residency window. • Converted value of ending address = Setting value of ending address (CC) x 15 + Setting value of ending address (HH) Setting value of ending address (CC) and Setting value of ending address (HH) is the value which is input in the Cache Residency window. 2.
• The user has the option of pre-staging the data to the resident cache area. If pre-staging is not used, the data will be loaded into the Cache Residency extents when the first miss occurs. If pre-staging is used, performance may be affected for a short time while the data is read into Cache Residency cache. Note: Pre-staging of Cache Residency data should not be performed during peak activity. • All write I/Os to Cache Residency data are duplex writes, guaranteeing full data integrity.
• Do not apply or refer to Cache Residency settings to volumes from the host and Remote Web Console computer at the same time, though you can apply the settings from the host if you use Cache Manager. • If you specify the Cache Residency Manager setting on the volume during the quick formatting, do not use the pre-staging function.
To identify the exact number of LBAs in an LDEV, you must first display the Reports Display window and search for the parity group to which the LDEV belongs according to the LDKC, control unit (CU), and LDEV numbers. Next, you must display the Customized Volume window and find the exact number of LBAs in the LDEV. For further information about the Reports Display window, see the HP StorageWorks XP24000/XP20000 Remote Web Console User Guide.
4 Using the Cache Residency Manager GUI This chapter describes the various elements of the Cache Residency Manager graphical user interface. • “Cache Residency Window” (page 19) • “Multi Set Dialog Box” (page 29) • “Multi Release Dialog Box” (page 31) This chapter describes only the Cache Residency window and associated dialog boxes. For general information on Remote Web Console features, see the HP StorageWorks XP24000/XP20000 Remote Web Console User Guide.
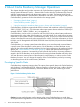
Figure 4 Cache Residency Window (Open-systems LDEV selected) Figure 5 Cache Residency Window (Mainframe LDEV selected) 20 Using the Cache Residency Manager GUI
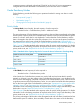
CLPR list The figure below shows the CLPR list, which is located in the upper-right corner of the Cache Residency window. Use the CLPR list to select the CLPR containing the desired CUs and LDEVs. The cache information for the selected CLPR and the CUs and volumes belonging to the selected CLPR will appear in the Cache Residency window. If you administer more than one CLPR, use the CLPR list to select a CLPR by name and number.
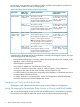
Table 4 Icons in the CU:LDEV tree Icon Description Indicates an open/expanded folder. An open LDKC folder displays the CUs that belong to that LDKC. An expanded CU folder displays the LDEVS that belong to that CU. Indicates an unopened/unexpanded LDKC or CU folder. Indicates that the LDEV is an internal volume for which Cache Residency is not set or an external volume whose Cache mode is set to Enable.
LDEV information table when a mainframe LDEV is selected LDEV information table showing a requested operation Cache Residency Window 23
Table 5 LDEV information table details Item LDEV ID Description Information about the LDEV selected in the CU:LDEV tree: • LDKC:CU:LDEV (“#” after the LDEV number indicates an external volume) • Emulation type • Volume capacity in MB for open-systems LDEVs, in cylinders and tracks for mainframe LDEVs • RAID level Data location Data location of the LDEV by starting and ending addresses:LBA for open-systems LDEVs or CC HH for mainframe LDEVs.
Figure 6 Cache Information Area Figure 7 Pre-staging Operation in Progress Figure 8 Cache Residency Operation in Progress Cache Residency Window 25
The cache information area has the following features: Item Total Num. of Cache Residency Areas in SLPR Description If you are logged into Remote Web Console as a storage administrator, Total Num. of Cache Residency Areas in SLPR displays the total number of Cache Residency cache extents that can be set in the selected CU group (maximum: 16,384). If you are logged into Remote Web Console as a storage partition administrator, Total Num.
Figure 9 Operations Box (open-systems LDEV selected) Figure 10 Operations Box (mainframe LDEV selected) Cache Residency Window 27
The Operations box has the following features: Item Cache Residency Mode Description Select the mode for the data to be added to Cache Residency cache: • Bind sets bind mode. Note: The Cache Residency bind mode is not available to external volumes whose Cache mode is set to Disable (which is the mode that disables the use of the cache when there is an I/O request from the host). • Priority sets priority mode. Once you have requested a Cache Residency Manager operation, the mode buttons become disabled.
Item Multi Set / Release Description Allows you to request Cache Residency operations for more than one LDEV. If you check this box and then click Set or Release, the Multi Set or Multi Release dialog box opens to allow you to set data into or release data from Cache Residency cache for more than one LDEV. The Multi Set / Release checkbox does not allow you to select and cancel an individual Cache Residency data area specified for an LDEV.
1. Select the desired options on the Cache Residency window: To specify a range of data to place in Cache Residency cache, enter the starting and ending addresses in the Start and End boxes. To place all data areas of the selected LDEVs into Cache Residency cache, check the Select All Area option. 2. 3. Enable the Multi Set / Release option. Click Set, and then click OK on the confirmation message. The Multi Set dialog box opens with the selected options displayed.
Table 6 Multi Set dialog box details (continued) Item LDEV information table Description LDEVs in the selected CU image are available for the Multi Set function. Note that only volumes owned by the CLPR selected from the CLPR list in the Cache Residency window are shown in the LDEV table. • LDEV displays the LDEV number. An LDEV number that ends with a # mark indicates that the LDEV is an external volume (for example, 01#). • Size indicates the size of the LDEV.
Table 7 Multi Release dialog box details Item Description LDKC Selects the LDKC that contains the desired CU and LDEVs. CU Selects the CU image that contains the desired LDEVs. Only CUs owned by the selected CLPR are displayed in the Multi Release dialog box. LDEV information table LDEVs in the selected CU image that are available for the Multi Release function.
5 Performing Cache Residency Manager Operations Cache Residency allows you to place data into Cache Residency cache and to release data from Cache Residency cache.
a. b. Select the desired mode (Bind or Priority) in the Cache Residency Mode box. Select the desired Pre-staging Mode setting (Yes or No). Note: To set the pre-staging function, the Pre-staging check box (upper-left corner of the Cache Residency window) must already be selected. c. Verify the starting and ending addresses of the area to be placed in Cache Residency cache in the Start and End fields. Edit as needed. Make sure that the Select All Area box is NOT checked.
Figure 13 Selecting LDEV and Specifying Data Area and Options Figure 14 Confirmation Message for Placing Data into Cache Placing Specific Data into Cache Residency Cache 35
Figure 15 Specifying Same Data Area and Options for Multiple LDEVs Figure 16 Selecting Additional LDEVs on Multi Set Dialog Box (Specific Data Range) 36 Performing Cache Residency Manager Operations
Figure 17 Verifying Add Data Area Operation Placing LDEVs into Cache Residency Cache Use this procedure when you want to place ALL data on one or more LDEVs into Cache Residency cache. Note: Performing Cache Residency operations on many LDEVs during host I/O may cause the response time of the I/O host to become slow. To avoid a slow response time, try to set only one LDEV at a time. To place all data on one or more LDEVs into Cache Residency cache: 1. 2.
4. If you do not want to apply the same options to any other LDEVs, make sure that the Multi Set / Release box is not checked, click Set, and then click OK on the confirmation dialog box. The requested operation is displayed in blue in the LDEV information table. To apply the same options to additional LDEVs: a. b. c. 5. Select the Multi Set / Release box in the Cache Residency window, click Set, and then click OK to open the Multi Set dialog box.
Figure 19 Selecting LDEVs to Place in Cache Residency Cache Figure 20 Selecting Additional LDEVs on Multi Set Dialog Box (All Data) Placing LDEVs into Cache Residency Cache 39
Figure 21 Verifying Add LDEV Operations Releasing Specific Data from Cache Residency Cache Use this procedure when you want to release specific data areas on one or more LDEVs from Cache Residency cache. Note: Deleting the data from many LDEVs during host I/O may cause the host I/O response time to become slow. To avoid a slow response time, try to delete the data for only one LDEV at a time.
4. Click Release, and then click OK on the confirmation message. The requested operation is displayed in blue in the LDEV information table. 5. Repeat steps 2 through 4 for each LDEV for which you want to release specific data from Cache Residency cache. Note: You cannot use the Set button until you apply (or cancel) your requested operations. 6. 7. 8. Verify the Pre-staging setting: • To enable pre-staging, select Pre-staging. • To disable pre-staging, clear Pre-staging.
Figure 23 Confirmation Message for Deleting Data Figure 24 Verifying Release Data Operations Releasing LDEVs from Cache Residency Cache Use this procedure when you want to release ALL data on one or more LDEVs from Cache Residency cache. Note: Deleting the data from many LDEVs during host I/O may cause the host I/O response time to become slow. To avoid a slow response time, try to delete the data for only one LDEV at a time.
3. If you do not want to release any other LDEVs from Cache Residency cache, make sure that the Multi Set / Release box is not checked, click Release, and then click OK on the confirmation dialog box. The requested operation is displayed in blue in the LDEV information table. To release additional LDEVs from Cache Residency cache: a. b. c. 4. Check the Multi Set / Release box, click Release, and then click OK on the confirmation message to open the Multi Release dialog box.
Figure 26 Selecting Multiple LDEVs on Multi Release Dialog Box Figure 27 Verifying operations after LDEV Data from Cache Changing Modes after Cache Residency is Registered in Cache If Cache Residency is registered in the cache, the following mode options appear gray and are unavailable for change: • Cache Residency Mode (Bind, Priority) • Pre-staging Mode (Yes, No) To change the mode options: 44 Performing Cache Residency Manager Operations
1. 2. Release the cache extent. Restore the data with the new settings.
6 Troubleshooting This chapter explains how to troubleshoot problems that you might experience while using Cache Residency Manager. • “Troubleshooting” (page 46) • “Calling HP Technical Support” (page 46) Troubleshooting For troubleshooting information on the storage system, see the HP StorageWorks XP24000/XP20000 Disk Array Owner Guide. For troubleshooting information on the Remote Web Console software, see the HP StorageWorks XP24000/XP20000 Remote Web Console User Guide.
7 Support and Other Resources Related Documentation • HP StorageWorks XP24000/XP20000 Disk Array Owner Guide • HP StorageWorks XP24000/XP20000 Remote Web Console User Guide • HP StorageWorks XP24000/XP20000 Disk/Cache Partition User Guide • HP StorageWorks XP24000/XP20000 Virtual LVI/LUN (VLL) and Volume Shredder User Guide • HP StorageWorks XP24000/XP20000 Business Copy Software User Guide • Hitachi ShadowImage™ for Mainframe User Guide: HP XP24000/XP20000 Disk Array You can find these document
• Operating system type and revision level • Detailed questions Subscription Service HP recommends that you register your product at the Subscriber’s Choice for Business website: http://www.hp.com/go/e-updates After registering, you will receive email notification of product enhancements, new driver versions, firmware updates, and other product resources. HP Websites For additional information, see the following HP websites: • http://www.hp.com • http://www.hp.com/go/storage • http://www.hp.
A Device Types Other Than OPEN-V This appendix lists Cache Residency information for open system volumes other than OPEN-V: OPEN-3, OPEN-8, OPEN-9, OPEN-E, and OPEN-L. To ensure product compatibility with your device type, contact your HP service representative for the latest information. Configuring Cache for Priority Mode When configuring cache for device types other than OPEN-V, remember that the capacity per slot is 66 KB.
Table 9 Logical Block Addresses for Device Types Other Than OPEN-V (continued) 50 Starting LBA Ending LBA Starting LBA Ending LBA 960 1055 2880000 2880095 1920 2015 3661824 3661919 2880 2975 3840000 3840095 3840 3935 4800000 4800095 4800 4895 4806624 4806719 5760 5855 4806720 4806815 6720 6815 5760000 5760095 7680 7775 6720000 6720095 8640 8735 7680000 7680095 9600 9695 8640000 8640095 19200 19295 9600000 9600095 29900 28895 10560000 10560095 38400 3849
Glossary C CCHH Cylinder, cylinder, head, head. CLPR Cache logical partition. CRM Cache Residency Manager. CU Control unit. F FD Floppy disk. L LBA Logical block address. LD, LDEV Logical device. An LDEV is created when a RAID group is carved into pieces according to the selected host emulation mode (that is, OPEN-3, OPEN-8, OPEN-9). The number of resulting LDEVs depends on the selected emulation mode. The term LDEV is also known as term volume. LDKC Logical disk controller.
Index Multi Set / Release check box, 29 Multi Set dialog box, 29 B bind mode, 7 C cache extents, 15 Cache Residency, 19 cache extents, 15 enabling and disabling, 10 modes, 7 overview, 6 placing data into cache, 33 RAID-5, RAID-1, 8 releasing data from cache, 40 releasing LDEV from cache, 42 requirements, 10 restrictions, 16 troubleshooting, 46 cache slot, 15 CLPR, 21 conventions storage capacity values, 47 O OPEN-x 3, 8, 9, E, L, 49 P placing data into Cache Residency cache, 33 placing LDEV into Cache R