
HP XC System Software Hardware Preparation Guide Version 4.0

Setup Procedure
Perform the following procedure for each HP ProLiant DL160 G5 node in the hardware
configuration. Change only the values described in this procedure; do not change any other
factory-set values unless you are instructed to do so. Follow all steps in the sequence shown:
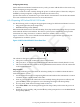
1. Use the instructions in the accompanying HP ProLiant hardware documentation to connect
a monitor, mouse, and keyboard to the node.
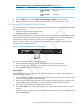
2. Turn on power to the node. Watch the screen carefully during the power-on, self-test, and
press the F10 key when prompted to access the BIOS Setup Utility. The Lights-Out 100i
(LO-100i) console management device is configured through the BIOS Setup Utility.
The BIOS Setup Utility displays the following information about the node:
BIOS ROM ID:
BIOS Version:
BIOS Build Date:
Record this information for future reference.
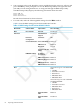
3. For each node, make the following BIOS settings from the Main window.
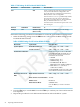
The BIOS settings for HP ProLiant DL160 G5 nodes are listed in Table 4-4.
Table 4-4 BIOS Settings for HP ProLiant DL160 G5 Nodes
Set to This ValueOption NameSubmenu NameMenu Name
Disabled
NumlockBoot FeaturesMain
Disabled
8042 Emulation
Support
Advanced
Enabled
Remote AccessRemote Access
Configuration
Enabled
EMS Support
(SPCR)
11520 8,n,1
Serial Port Mode
Always
Redirection after
BIOS POST
VT100
Terminal Type
LAN ConfigurationIPMI Configuration
Disabled
Share NIC Mode
Enabled
DHCP IP Source
If this node is the head node, set this
value to:
Hard Drive
For all other nodes, set this value to:
Embedded NIC1
1st Boot DeviceBoot Device PriorityBoot
If this node is the head node, set this
value to:
Embedded NIC1
Otherwise, set this value to:
Hard Drive
2nd Boot Device
66 Preparing Individual Nodes