
Incorporating External NICs HowTo


NOTE: If you are using IPv6 or MTU, there are additional options that you should specify. Enter
the following command for more information:
# /opt/hptc/config/sbin/device_config --help
4 Applying the HowTo
The following list summarizes the steps to incorporate one or more network interface card for
an HP XC system node:
1. “Consolidating Data for the HowTo” (page 14)
2. “Edit the platform_vars.ini Configuration File” (page 14).
3. “Update the Database for the External Network Card” (page 16).
4. “Update the Firewall Custom Configuration” (page 17)
5. “Reconfiguring the Nodes” (page 20)
4.1 Consolidating Data for the HowTo
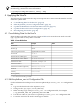
Enter the data collected in the previous section in Table 4. For more than one node or model
type, copy the table as many times as needed.
Table 4 Data Worksheet
ValueExampleData
n19
Node name
rx4640Model type
Gigabit Ethernet or OtherInterconnect Switch used
03:01.0
PCI bus ID
1
external1
Ethernet device number/port
00:00:00:00:00:01
Ethernet device's MAC address
station1.example.com
External host name
192.0.2.10
External IP address
FF01:0:0:0:0:0:0:43
External IPv6 address (optional)
255:255:248:0
Netmask
192.0.2.100
Gateway
MTU (optional)
1 Not valid for the model type rx8620
4.2 Edit the platform_vars.ini Configuration File
Use the information from the previous section to update the platform_vars.ini configuration
file.
1. Log in to the head node as the superuser (root).
2. Change to the /opt/hptc/config directory.
3. Make a backup copy of the platform_vars.ini configuration file, for example:
# cp platform_vars.ini platform_vars.ini.BAK
4. Use the text editor of your choice to open the platform_vars.ini configuration file.
5. Locate the stanza for the node's model type in the file.
14