
HP XC System Software Installation Guide Version 3.0


5. This step applies only to Itanium-based systems (HP Integrity servers). Skip this step for all other chip
architectures and proceed to step 6.
After displaying some power-on messages, the node power-on process displays the Boot Menu. Use
the arrow keys on the keyboard to select the DVD ROM as the boot device. How you do so depends
on upon how the EFI environment is configured.
• Select the preconfigured option to boot from the CD or DVD device if it is available. Proceed to
step 6.
• If the option to boot from the CD or DVD device is not available, select the EFI Shell option
and do the following:
a. Display the device mapping table:
EFI Shell> map
b. Locate the DVD device name (such as fs0) and press the Enter key:
fs0: Enter
c. Proceed to step 6.
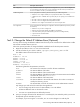
6. At the boot prompt, enter the appropriate boot command to start the installation process and specify
the name of the Kickstart file (ks.cfg). You must act fast, because the system does not pause very long
at the boot prompt. As listed in Table 3-7, the command line is different depending upon your cluster
platform architecture and how your boot device was set.
Note
Some hardware models require additional parameters to be included on the command line. Before
booting the head node, look in the
HP XC System Software Release Notes
to make sure there are no
additional command line options for your hardware model.
Table 3-7 Upgrade Boot Command Line Based on Cluster Platform Architecture
Boot Command LineArchitecture TypeCluster Platform
boot: linux ks=cdrom:/ks.cfg
Opteron and XeonCP3000 and
CP4000
ELILO boot: linux ks=cdrom:/ks.cfg
Itanium (when the boot
device was set through
the preconfigured boot
option and the ELILO
boot: prompt is
displayed)
CP6000
fs0:> elilo linux ks=cdrom:/ks.cfg
Itanium (when the boot
device was set through
the EFI Shell option
and the fs0:> prompt is
displayed)
CP6000
7. When prompted, answer the questions listed in Table 3-6. You have the opportunity to confirm every
answer before continuing to the next question.
When you have answered all questions, the unattended software load process begins. The total software
load takes about 15 minutes. A progress bar is displayed as the Linux RPMs are loading.
As the XC specific RPMs are loading, the following message is displayed and remains on the screen
for 5 minutes until the software load is complete:
Installing additional cluster rpms
Important
After the software load is complete, ensure that the DVD is ejected from the drive before continuing.
On systems with a retractable DVD device, you must remove the installation DVD before the system
reboots.
If you do not remove the DVD, a second installation process is initiated from the DVD when the system
reboots. If a second installation process is started, halt the process and remove the DVD. Upon reboot,
Task 2: Start the Installation Process 31