
HP XC System Software Installation Guide Version 3.0
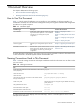

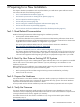


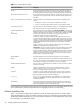
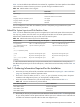

Table 3-5 Distribution Media
Software DVD TitleCluster Platform Model
HP XC System Software for Intel Xeon Systems Version 3.0CP3000
HP XC System Software for AMD Opteron Systems Version 3.0CP4000
HP XC System Software for Intel Itanium 2 Processors Version 3.0CP6000
• Be prepared to supply the information listed in Table 3-6 during the Kickstart installation session.
Table 3-6 Information Required for the Kickstart Installation Session
Description and User ActionItem
During the installation process, a numbered list of disks discovered on the head node is displayed,
and you must select a disk on which to install the software.
The following restrictions apply to the disk you select:
Hard disk to use for the installation
• Must be 36 GB or larger
• Must not be connected to a SAN device
The /hptc_cluster file system is the global, or clusterwide, file system on an HP XC system.
This file system is shared and mounted by all nodes and contains configuration and log file
information that is required for all nodes in the system. This file system is intended for XC
management use and should not be used for user accounts or job launching.
You have the option to create a disk partition for the /hptc_cluster file system somewhere
other than the installation disk (also known as the system disk) on the head node. For example,
you may want to create a partition for this file system on an HP SFS server for failover capability
or on another separate disk on the head node.
The prompt looks similar to the following:
Should the XC global file system (/hptc_cluster)
be created as a partition on the system disk?
If you answer no to this prompt, you must manually create and mount the /hptc_cluster file
system somewhere else. See “Create the /hptc_cluster File System (Optional)” (page 47) for
instructions.
Where to create a partition for the
/hptc_cluster file system
If an existing disk partition table that can be reused is detected on the head node installation
disk, you are prompted either to reuse the existing partitions or apply the XC default disk partition
table. Choosing the default disk partition table overwrites any data on the installation disk.
The prompt looks similar to the following:
Would you like to reuse the existing partition table
or would you like to use the XC default partition table?
Enter "r" to reuse or "d" to use the XC default:
The default partition table is listed in Table 3-3 (page 29).
If the existing disk partition table cannot be reused, you have the option to exit the installation
process to repartition the system disk manually. Alternatively, you can continue the installation
process using the default partition table.
Reuse existing disk partitions or use
default partition table
Select the time zone in which your system is located. The default is America/New York (Eastern
Standard Time, which is Greenwich Mean Time minus 5 hours).
Use the Tab key to move through the list of time zones, and use the Space bar to highlight your
selection. Then, use the Tab key to move to OK, and press the space bar to select OK.
Time zone
Define a password for the root user. You are prompted to enter it again for verification purposes.
Use the Tab key to move the cursor on the screen; then, press the Space bar to select OK.
See “Setting Strong Passwords” (page 101) for recommendations on choosing strong root
passwords.
Root password
Task 2: Start the Installation Process
Follow this procedure to install the HP XC System Software:
1. Begin this procedure on the head node.
2. Turn off power on all nodes.
3. Turn on power to the head node.
4. Insert the DVD distribution media into the drive on the head node to boot from the DVD.
30 Installing Software on the Head Node