
HP XC System Software Hardware Preparation Guide Version 3.2
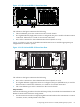
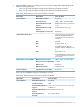

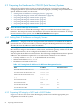

Table 4-26 RBSU Settings for HP ProLiant DL585 G2 Nodes (continued)
Set to This ValueOption NameMenu Name
Set the following boot order on all nodes except
the head node; the CD-ROM must be listed before
the hard drive:
• IPL:1 CD-ROM
• IPL:2 Floppy Drive (A:)
• IPL:3 USB Drive Key (C:)
• IPL:4 PCI Embedded HP NC373i
Multifunction Gigabit Adapter
• IPL:5 Hard Drive C:
Standard Boot Order (IPL)
Set the following boot order on the head node:
• IPL:1 CD-ROM
• IPL:2 Floppy Drive (A:)
• IPL:3 USB Drive Key (C:)
• IPL:4 Hard Drive C:
COM1
BIOS Serial Console PortBIOS Serial Console and
EMS
115200
BIOS Serial Console Baud
Rate
Disabled
EMS Console
Command Line
BIOS Interface Mode
Enabled
Linux x86_64 HPET OptionAdvanced
2. Press the Esc key to exit the RBSU. Press the F10 key to confirm your choice and restart the
boot sequence.
3. Repeat this procedure for each node HP ProLiant DL585 G2 node in the hardware
configuration.
Configuring Smart Arrays
On such hardware models as the HP ProLiant DL585 G1 and DL585 G2 with smart array cards,
you must add the disks to the smart array before attempting to image the node.
To do so, watch the screen carefully during the power-on self-test phase of the node, and press
the F8 key when prompted to configure the disks into the smart array.
Specific instructions are outside the scope of the HP XC documentation. See the documentation
that came with the HP ProLiant server for more information.
4.7.5 Preparing HP xw9300 and xw9400 Workstations
HP xw9300 and xw9400 workstations are typically used when the HP Scalable Visual Array
(SVA) software is installed and configured to interoperate on an HP XC system. Configuring an
xw9300 or xw9400 workstation as the HP XC head node is supported.
Figure 4-15 shows a rear view of the xw9300 workstation and the appropriate port connections
for an HP XC system.
84 Preparing Individual Nodes