
HP XC System Software Hardware Preparation Guide Version 3.0


e. Enter Y to save the entry to NVRAM.
f. Select Exit to quit.
For more information about how to work with these menus, see the documentation that came with your
model of HP Integrity server.
10. Perform this step on all nodes except the head node. From the Boot Configuration screen, select
the option to Edit OS Boot Order:
a. Use the navigation instructions on the screen to move the Netboot entry you just defined to the
top of the boot order.
b. Enter Y to save the entry to NVRAM.
c. Select Exit to close the menu.
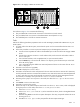
11. Perform this step on all nodes, including the head node:
a. Select the Select Input Console option to enable console messages to be displayed on the
screen when you turn on the system:
i. Enable the Acpi(HWP0002,0)/Pci(1|1)/Uart(9600 N81)/VenMsg(Vt100+) option.
ii. Enter Y to save the entry to NVRAM.
iii. Select Exit to return to the menu.
b. Select the Select Output Console option to enable console messages to be displayed on
the screen when you turn on the system:
i. Enable the Acpi(HWP0002,0)/Pci(1|1)/Uart(9600 N81)/VenMsg(Vt100+) option.
ii. Enable the Acpi(HWP0002,0)/Pci(4|0) option.
iii. Enter Y to save the entry to NVRAM.
iv. Select Exit to return to the menu.
c. Select the Select Active Standard Error Devices option from the Boot Option
Maintenance Menu to enable console messages to be displayed on the screen when you turn
on the system.
i. Enable the Acpi(HWP0002,0)/Pci(1|1)/Uart(9600 N81)/VenMsg(Vt100+) option.
ii. Enable the Acpi(HWP0002,0)/Pci(4|0) option.
iii. Enter Y to save the entry to NVRAM.
iv. Select Exit to return to the menu.
d. Press the Esc key to return to the Boot Menu.
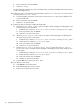
12. Turn off power to the node:
a. Press Ctrl+b to exit console mode.
b. Enter CM to display the Command Menu.
c. Enter PC to turn off power to the node.
52 Preparing Individual Nodes