
HP XC System Software Hardware Preparation Guide Version 3.0
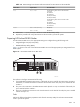
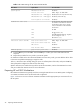
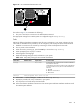
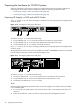
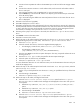
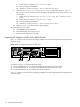

Figure 3-9 HP xw9300 Workstation Rear View
1
The callout in Figure 3-9 enumerates the following:
1. This port is used as the connection to the Administration Network.
The appropriate settings for an HP XC system are configured using the Setup Utility.
Tasks
Perform the following hardware preparation tasks for every workstation in your system. Change only the
values that are described in this procedure; do not change any other factory-set values unless instructed:
1. Establish a connection to the console by connecting a monitor and keyboard to the node.
2. Turn on power to the workstation.
3. When the node is powering up, press the F10 key to access the Setup Utility.
4. When prompted, press any key to continue.
5. Select English as the language.
6. Make the following settings for each workstation in your system:
Table 3-14 Setup Utility Settings for HP xw9300 Workstations
Set To This ValueOption NameSubMenu NameMenu Name
On the head node, set the boot order so that the CD-ROM is
listed before the hard disk.
Set the following boot order on all other nodes; CD-ROM does
not have to be first in the list, but it must be listed before the
hard disk:
Boot OrderStorage
1. CD-ROM
2. Network Controller
3. Hard Disk
OnAfter Power LossPower/Sleep/WakeAdvanced
7. Select File –> Save Changes & Exit to exit the Setup Utility.
8. Repeat this procedure for every workstation in your system.
9. Turn off power to all nodes except the head node.
10. Follow the software installation instructions in the
HP XC System Software Installation Guide
to install
the HP XC System Software.
Tasks 47