
HP XC System Software Hardware Preparation Guide Version 3.0
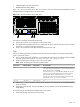

1. Turn on power to the node. Watch the screen carefully during the power-on self-test, and press the F8
key when prompted to access the Integrated Lights Out Setup Utility.
2. Make the following iLO settings for each node in your system:
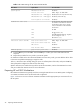
Table 3-10 iLO Settings for HP ProLiant DL385 Nodes
Set To This ValueOption NameSubMenu NameMenu Name
Create a common iLO user name and password for every node in
your system. The password must have a minimum of 8 characters by
default, but this value is configurable.
The user Administrator is predefined by default, but you must
create your own user name and password. For security purposes,
HP recommends that you delete the Administrator user.
This user name and password are required to access the console
port with the telnet cp-nodename command.
AddUser
OnDHCP EnableDNS/DHCPNetwork
3. Select File –> Exit to exit the Integrated Lights Out Setup Utility and resume the
power-on self-test.
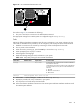
4. Watch the screen carefully, and press the F9 key when prompted to access the ROM-Based Setup
Utility (RBSU).
Perform the following hardware preparation tasks from the RBSU for each HP ProLiant DL385 node in your
system:
1. Make the following settings from the RBSU; use the navigation aids shown at the bottom of the screen
to move through the menus and make selections:
Table 3-11 RBSU Settings for HP ProLiant DL385 Nodes
Set To This ValueOption NameMenu Name
On all nodes except the head node, set this value to Enable
NIC1 PXE
1
On the head node only, set this value to Embedded NIC
PXE Disabled
Embedded NIC Port PXE
Support
System Options
On the head node, set the boot order so that the CD-ROM
is listed before the hard disk.
Set the following boot order on all other nodes:
Standard Boot Order (IPL)
1. CD-ROM
2. NIC1
3. Hard Disk
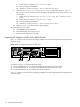
1 A small blue dialog box near the bottom left side of the screen indicates the current setting. You can make only one setting
per node.
2. Make any other BIOS settings at this time. Specific instructions for this task are outside the scope of this
document because the information depends on the hardware involved. You can find more information
on other BIOS settings in the documentation that came with your model of HP ProLiant server.
3. Press the Esc key to exit the RBSU. Press the F10 key to confirm your choice and restart the boot
sequence.
4. Repeat this procedure for every node in your HP XC system.
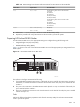
On hardware models such as the HP ProLiant DL385 with smart array cards, you must add the disk or disks
to the smart array before attempting to image the node.
To do so, watch the screen carefully during the power on self-test phase of the node, and press the F8 key
when prompted to configure the disks into the smart array.
Specific instructions are outside the scope of the HP XC documentation; see the documentation that came
with your model of HP ProLiant server for more information.
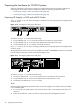
Preparing HP ProLiant DL585 Nodes
On HP ProLiant DL585 servers, the appropriate settings are configured using the following tools:
44 Preparing Individual Nodes