
HP XC System Software Administration Guide Version 3.2.1


8. Run the following utility:
# /opt/hptc/hpcgraph/sbin/hpcgraph-setup
9. Image the added nodes as follows:
# startsys --image_and_boot nodelist
Where nodelist is the list of the actualized nodes.
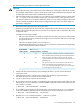
10. Verify the existence of the actualized nodes with any of the following utilities:
• ovp
• shownode
The actualized nodes are enabled. Other planned nodes that were not actualized are
shown as disabled.
• sinfo
The actualized nodes are shown as up. Other planned nodes that were not actualized
are shown as down.
22.4 Replacing a Server Blade Enclosure OnBoard Administrator
The following procedure describes how to replace the physical Onboard Administrator for a
server blade enclosure in an HP XC system, where the head node is not a server blade.
1. Log in as superuser (root) on the head node.
2. Back up the CMDB. For information see “Backing Up the Configuration Database” (page 83).
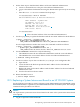
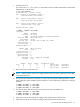
3. Use the shownode command to find the IP address and the MAC address for the Onboard
Administrator.
# shownode config enclosures
enclosures:
n-enc00306eab7100:
name: n-enc00306eab7100
number: 1
number_blade_bays: 0
oA:
OA1-n-enc00306eab710
IPV6_address:
bay_number: 1
currentRole: ACTIVE
fwrev:
host_name: OA1-n-enc00306eab7100
hwaddr: 01:02:03:04:05:06
1
ipaddr: 172.31.32.2
2
type: virtual
uuid: 00:30:6e:ab:71:00
1
Onboard Administrator MAC address
2
IP address for the Onboard Administrator
Note the IP address and MAC address; you will need them later in this procedure.
4. Physically replace the Onboard Administrator card.
5. Set the Onboard Administrator password by following the procedure in the HP XC Hardware
Preparation Guide.
276 Servicing the HP XC System