
Installing LSF-HPC With SLURM Into an Existing Standard LSF Cluster


3. Add the appropriate fstab file entry to the /hptc_cluster/etc/fstab.proto file in the
section titled ALL.
4. Restart the cluster_fstab service cluster-wide. For this example:
# pdsh -a mkdir -p /shared/lsf
# pdsh -a service cluster_fstab restart
Ensure that the XC resource_management
nodes have an external connection
The node that is configured as the LSF node (which will be one of the resource_management nodes)
must be able to communicate with, and receive communication from, the existing LSF cluster on the
external network.
If there are nodes with the resource_management role that do not have external network access, you
must reconsider the cluster configuration to ensure that LSF on XC runs only on nodes that have
external network access. Options include:
• Adding additional network hardware to current resource_management nodes
• Reassigning the resource_management role.
See the XC Installation Guide for more information on configuring and reconfiguring roles in XC.
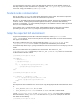
Use the shownodes command to ensure that each node that was configured as a
resource_management node during cluster_config also has access to the external network:
[root@xc128 root]# shownode roles --role resource_management external
resource_management: xc[127-128]
external: xc[125-128]
If this command is not available, check the role assignments by running the cluster_config
command and viewing the node configurations.
NOTE: Use the quit command to close cluster_config when you have determined the configuration. Do
not reconfigure the cluster with any changes at this point. There is another opportunity to reconfigure the cluster
later in this procedure.
In the next four steps, you make modifications to the head node configuration and propagate the
changes to the rest of the cluster. The recommended method is to use the updateimage and the
updateclient commands as documented in the HP XC System Software Administration Guide.
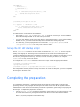
Lower the firewall on the XC external network
For this procedure, open up the unprivileged ports (1024-65535) plus one privileged port (1023) on
the external network by adding the following lines to /etc/sysconfig/iptables.proto on the
head node:
-A RH-Firewall-1-INPUT -i External -p tcp -m tcp --dport 1023:65535 -j ACCEPT
-A RH-Firewall-1-INPUT -i External -p udp -m udp --dport 1023:65535 -j ACCEPT
This file establishes the initial firewall rules for all nodes. The revised rules open up all the
unprivileged ports externally and one privileged port (1023). Opening up the privileged port allows
LSF commands run as root on XC to communicate with non-XC LSF daemons. LSF commands
executed by the root account always use privileged ports. If necessary, you can avoid opening the
privileged port.