
HP XC System Software Installation Guide Version 2.1


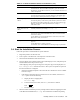
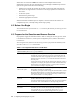

Table 3-4: Distribution M edia
Cluster
Platform
Model Software DVD Title
CP3000
HP XC System Software for Intel Xeon Systems Version 2.1
CP4000
HP XC System Software for AMD Opteron Systems Version 2.1
CP6000
HP XC System So
ftware for Intel Itanium 2 Processors Version 2.1
• Know how to use a text editor (such as vi, emacs,orgedit) because at some points in
the system installation and configuration process, you are required to modify text files.
3.3 Prepare for the Question-and-Answer Session
Table 3-5 describes the information you m ust be prep ared to sup ply during the Kickstart
installation session.
Table 3-5: Software Installation Questions and Answers
Item Description and User Action
Hard disk to use for the
installation
During the installation process, a numbered list of disks discovered on the
head node is displayed, and you must select a disk on which to install the
software. Enter the number that corresponds to first disk in the list.
Although more than one disk may be displayed, it is important that you
select the first disk in the list because disks other than the first disk are
not supported due to restrictions in the i mage replication environment
for this release.
Th
e name of the first disk varies by cluster platform and server model:
Cluster Platform First Disk Name
CP3000
/dev/cciss/c0d0 on HP ProLiant
nodes with HP SmartArray disks
/dev/sda on HP ProLiant DL360 G4
nodes with SATA (Serial ATA) disks
/d
ev/cciss/c0d0 on HP ProLiant
DL
380 G4 nodes
CP4000
/d
ev/cciss/c0d0 on HP ProLiant
D
L585 nodes
/dev/hda on HP ProLiant DL145 nodes
CP6000
/dev/sda on all HP Integrity servers
(models rx1620, rx2600, and rx2620)
The following additional restrictions apply:
• The first disk must be 36 GB or larger
•Th
e first disk must not be connected to a SAN device
Ethernet device to use
as the external network
device
During the installation process, a list of Ethernet devices to use as the head
node’s connection to the external network is displayed.
Enter the number that corresponds to the Ethernet connection you want to
use.
Use the information shown in Table B-1 in Appendix B to determine the
correct Ethernet port to choose.
3-4 Installing Software on the Head Node