
HP XC System Software Hardware Preparation Guide Version 2.1


iii. Change the BMC HTTP Service value from Disabled to Enabled.
6. From th e menus shown across the top of the Main window, choose Advanced ->
I/O Device Configuration, and change the value of Serial Port from SIO
COMM PORT to BMC COMM PORT.
_______________________ Note _______________________
As described in this step, you must change the value o f Serial Port
before proceeding to the next step.
7. From th e menus shown across the top of the Main window, choose Advanced ->
Console Redirection and do the following:
a. Change the Console Redirection value from Disabled to Enabled.
b. Change the Baud Rate value to 115.2K.
8. From the menus shown across the top of the Main window, choose Boot anddothe
following:
a. On the h ead node:
i. Set the boot order to this: CD-ROM, Removable Devices, Hard Drive.
ii. Disable PXE bo o ti ng by insert ing an exclamation point (!) at the beginning of
the following entries:
PXE MBA V7.7.2 Slot 0200
PXE MBA V7.7.2 Slot 0300
b. On compute nodes:
i. Set the boot order to this: CD-ROM, Removable Devices, PXE MBA
V7.7.2 Slot 0200, Hard Drive.
ii. Disable PXE bo o ti ng by insert ing an exclamation point (!) at the beginning of
the following entry:
PXE MBA V7.7.2 Slot 0300
9. From the Main menu of the BIOS, choose Power anddothefollowing:
a. Change the Wake On Modem Ring value from Enabled to Disabled.
b. Change the Wake On LAN value from Enabled to Disabled.
10. From the menus shown across the top of the Main window, select the Exit -> Save
Changes and Exit.
11. Repeat this procedure for every HP ProLiant DL140 G2 node in your XC system.
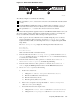
3.3.2 Preparing HP ProLiant DL360 G4 and DL380 G4 Nodes
On HP ProLiant DL360 G4 and DL3 80 G4 servers, the appropriate settings for XC are
configured using the following tools:
• Integrated Lights Out (iLO) Setup Utility
• ROM-Based Setup Utility (RBSU)
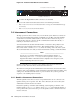
Figure 3-2 shows the back of the HP ProLian t DL360 G4 server.
3-4 Prepar ing Individual Nodes