
HP X5000 G2 Network Storage System Administrator Guide
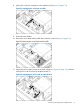
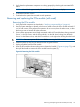

5. Complete the following (Figure 62 (page 77)):
a. Unplug the cable from the power UID button assembly (1).
b. Remove the screw from the power UID button assembly (2).
c. Remove the faulty power UID button assembly (3).
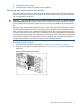
Figure 62 Removing the power UID button assembly
Replacing the power UID button assembly
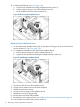
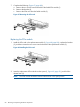
1. Complete the following (Figure 63 (page 77)):
a. Insert the replacement power UID button assembly (1).
b. Replace the screw in the power UID button assembly (2).
c. Plug the cable into the power UID button assembly (3).
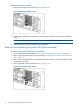
Figure 63 Replacing the power UID button assembly
2. Push the hard drive drawer back in the system enclosure.
3. Replace the hard drive fan module.
4. Replace the top back panel.
5. Replace the enclosure as described in “Inserting the system enclosure into the rack” (page 68).
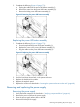
Removing and replacing the power supply
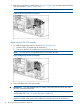
Removing the power supply
1. Verify the failed component as described in “Verifying component failure” (page 66).
2. Remove the power cord from the power supply.
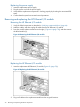
3. Press the power supply release lever to the left.
4. Remove the failed power supply.
Removing and replacing the power supply 77