
HP X5000 G2 Network Storage System Administrator Guide

Replacing the drive drawer
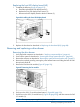
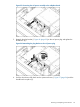
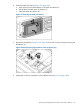
1. Unlock the side enclosure rail and push it into the back enclosure (Figure 93 (page 94)).
2. Align the bottom replacement drive drawer rails with the bottom enclosure rails.
Figure 93 Unlocking the enclosure rails
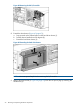
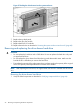
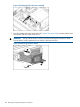
3. Align the side rails and then push the replacement drive drawer partially back into the system
enclosure until approximately two inches of the drawer is still out of the enclosure (Figure 94
(page 94)).
CAUTION: Do not push the drive drawer completely into the enclosure. You must first connect
the power coil assembly to prevent damaging the power coil assembly.
Figure 94 Partially installing the drive drawer
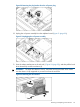
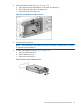
4. Pull the cable slightly out of the coil power plug and connect it to the midplane board (Figure 95
(page 95)).
94 Removing and replacing hardware components