HP x2301 LCD Monitor User Guide
© 2011 Hewlett-Packard Development Company, L.P. Microsoft and Windows are U.S. registered trademarks of Microsoft Corporation, ENERGY STAR® and the ENERGY STAR® mark are registered U.S. marks. The only warranties for HP products and services are set forth in the express warranty statements accompanying such products and services. Nothing herein should be construed as constituting an additional warranty. HP shall not be liable for technical or editorial errors or omissions contained herein.
About This Guide This guide provides information on setting up the monitor, installing drivers, using the on-screen display menu, troubleshooting and technical specifications. WARNING! Text set off in this manner indicates that failure to follow directions could result in bodily harm or loss of life. CAUTION: Text set off in this manner indicates that failure to follow directions could result in damage to equipment or loss of information.
iv About This Guide ENWW
Table of contents 1 Product Features ............................................................................................................... 1 HP x2301 LCD Monitor ............................................................................................................ 1 2 Safety and Maintenance Guidelines .................................................................................. 3 Important Safety Information ...............................................................................
Appendix B Technical Specifications ................................................................................... 21 HP x2301 Model ................................................................................................................... 21 Preset Video Modes ............................................................................................................... 22 Entering User Modes .....................................................................................................
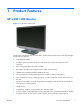
1 Product Features HP x2301 LCD Monitor Figure 1-1 HP x2301 LCD Monitor The HP x2301 LCD Monitor has an active matrix, thin-film transistor (TFT) screen with an LED backlight and the following features: ENWW ● Large diagonal display ● Maximum graphics resolution of 1920 x 1080 at 60Hz, plus full-screen support for lower resolutions ● VGA analog input signal with cable provided ● DVI digital input signal with single-link DVI-D to DVI-D cable provided ● High-definition multimedia interface (HDMI
2 ● Power Saver to reduce energy consumption ● Quick View settings display ● HDCP (High Bandwidth Digital Content Protection) on DVI and HDMI inputs ● Software and utilities CD containing drivers and documents Chapter 1 Product Features ENWW
2 Safety and Maintenance Guidelines Important Safety Information For displays with glossy bezels, consider the placement of the display, because the bezel might cause distracting reflections from surrounding light and bright surfaces. For information on the correct power cord set to use with the monitor, see Power Cord Set Requirements on page 25. WARNING! To reduce the risk of electric shock or damage to the equipment: • Do not disable the power cord grounding feature.
● Install your monitor near a power outlet that you can easily reach. ● Disconnect the monitor by grasping the plug firmly and pulling it from the outlet. ● Never disconnect the monitor by pulling the cord. ● Do not allow anything to rest on the power cord. ● Do not walk on the cord. Maintenance Guidelines To enhance the performance and extend the life of the monitor: ● Do not open the monitor cabinet or attempt to service this product yourself.
To prepare the monitor for shipping: ENWW 1. Disconnect the power and video cables from the monitor. 2. Place the monitor in the original packing box.
3 Setting Up the Monitor Unpacking the Monitor 1. Make sure all contents are included. Store the packing box. 2. Turn off the computer and other attached devices. 3. Prepare a flat area to assemble the monitor. NOTE: Use only the power cord and adapter provided with this monitor. Connecting Monitor Cables CAUTION: Before connecting cables to the monitor, ensure that the computer and monitor are powered off. The video source is determined by the video cable used.
Connecting the VGA Cable Connect one end of the VGA cable to the back of the monitor and the other end of the cable to the input device. A VGA cable is provided. Figure 3-2 Connecting the VGA cable Connecting the HDMI Cable (select models) Connect one end of the HDMI cable to the back of the monitor and the other end of the cable to the input device. An HDMI cable is provided with select models only.
Connecting the Power Cord 1. Follow all electrical and power warnings. WARNING! To reduce the risk of electric shock or damage to your equipment: Do not disable the power cord grounding plug. The grounding plug is an important safety feature. Plug the power cord into a grounded (earthed) electrical outlet. Be sure that the grounded power outlet you plug the power cord into is easily accessible to the operator and located as close to the equipment as possible.
High-Bandwidth Digital Content Protection (HDCP) Your monitor supports HDCP and can receive high-definition content. High-definition content is available in many sources, such as Blu-ray Disc devices or HDTV air or cable broadcasts. If you do not have an HDCP-enabled monitor, a blank screen or a lower resolution picture appears when playing high-definition protected content. Your computer graphics card and monitor must both support HDCP to display protected content. Turning on the Monitor 1.
2. Adjust the tilt by moving the top edge of the monitor either toward or away from you, without touching the screen.
4 Operating the Monitor CD Software and Utilities The CD that is included with this monitor contains drivers and software that you can install on your computer. Installing Drivers If you determine that you have to update the drivers, you can install the monitor driver INF and ICM files from the CD or download them from the HP website. Installing the monitor driver software from the CD 1. Insert the CD in your computer CD drive. The CD menu appears. 2. Select the language. 3.
Control Buttons Control buttons are located on the base of the monitor. Button Icon Description Source Chooses the video input source from the computer. Quick View Opens the OSD Quick View menu where you can select a viewing mode. Auto Adjust Press to activate the auto adjustment feature to optimize the screen image. OK Enters the selected option in the OSD. Menu Opens, selects, or exits the OSD menu.
Using the On-Screen Display (OSD) Use the On-Screen Display (OSD) to adjust the screen image based on your viewing preferences. To access the OSD: 1. Make sure the monitor is on. 2. To access the OSD menu, press the Menu button. The OSD Main Menu appears. 3. To navigate through the Main or sub-menu, press the + (Plus) button to scroll up, or the – (Minus) button to scroll in reverse. Then press the OK button to select the highlighted function.
Icon Main Menu Options Sub-menu Options Description Quick View Select from the following modes: Movie Photo Gaming Text Custom (settings saved when you adjust the Brightness, Contrast, or Color in one of the other Quick View options) Custom Color Selects and adjusts your own color scales: R — Sets your own red color levels. G — Sets your own green color levels. B — Sets your own blue color levels. Image Control 14 Chapter 4 Operating the Monitor Adjusts the screen image.
Icon Main Menu Options Sub-menu Options Description Sharpness Adjusts the screen image to look sharper or soft. Dynamic Contrast Ratio Sets the Dynamic Contrast Ratio (DCR) setting on or off. The factory default setting is off. DCR automatically adjusts the balance between white and black levels to provide you with an optimal image. OSD Control Adjusts the position of the OSD menu on the screen.
Icon Main Menu Options Sub-menu Options Description Monitor Status Displays the operating status of the monitor each time the monitor is powered on. Select the location at which to display the status: Top Middle Bottom Off The factory default is Top. DDC/CI Support Allows the computer to control some OSD menu features such as Brightness, Contrast, and Color Temperature. Select: On Off The factory default is On. Bezel Power LED Turns the light (LED) in the Power button on and off.
Icon Main Menu Options Sub-menu Options Description FW Version Reports the firmware version of the monitor. Backlight Hours Reports the total hours of backlight operation. Service Support For service support, see the HP Technical Support website at http://www.hp.com/ support. Factory Reset Returns settings to factory defaults. Source Control Selects the video input signal. The factory default by priority is DVI, HDMI, and then VGA. DVI Selects DVI as the video input signal.
● Check Video Cable—Indicates a video input cable is not properly connected to the computer or monitor. ● OSD Lockout—The OSD can be enabled or disabled by pressing and holding the Menu button on the front panel for 10 seconds. If the OSD is locked, the warning message OSD Lockout appears for 10 seconds. If the OSD is locked, press and hold the Menu button for 10 seconds to unlock the OSD. If the OSD is unlocked, press and hold the Menu button for 10 seconds to lock the OSD.
A Troubleshooting Resolving Common Issues Issue Solution Power LED is not on. Make sure the Power button is on, and the power cord is properly connected to a grounded power outlet and to the monitor. Select Management in the OSD menu, and then select Bezel Power LED. Verify that the Bezel Power LED option is set to Off and, if so, set to On mode. Screen is blank. Connect the power cord. Turn on the power. Connect the video cable properly. For more information, see Setting Up the Monitor on page 6.
Issue Solution Picture bounces, flickers, or wave pattern is present in the picture. Move electrical devices that might cause electrical interference as far away from the monitor as possible. Using HDMI connection, unable to hear audio. The monitor does not provide an audio solution. The audio stream must be connected directly to external speakers or to an audio receiver. Monitor is always in sleep mode (amber LED). Power to the computer must be turned on.
B Technical Specifications All specifications represent the typical specifications provided by HP's component manufacturers; actual performance might vary either higher or lower. HP x2301 Model Table B-1 x2301 Specifications ENWW Display Type: TFT LCD active matrix Viewable Image Size: 58.42 cm (23.0 in.) diagonal Video Input Terminals: VGA, DVI, HDMI Tilt: -5° to +15° Maximum Weight (unpacked): 3.5 kg (7.7 lb) Dimensions (h x w x d): 399.9 x 552.1 x 138.7 mm (15.74 x 21.74 x 5.
Preset Video Modes The monitor automatically recognizes many preset video input modes that will appear properly sized and centered on the screen. Table B-2 Factory Preset Video Input Modes Preset Resolution Horizontal Frequency (kHz) Vertical Frequency (Hz) 1 640 x 480 31.469 59.94 2 720 x 400 31.469 70.087 3 800 x 600 37.879 60.317 4 1024 x 768 48.363 60.004 5 1280 x 720 45.00 60.00 6 1280 x 960 60.00 60.00 7 1280 x 1024 63.98 60.02 8 1440 x 900 55.94 59.
automatically stores the new setting, then recognizes the new mode just as it does a preset mode. In addition to the factory preset modes, there are at least ten user modes that can be entered and stored. LCD Monitor Quality and Pixel Policy Your LCD Monitor uses high-precision technology, manufactured according to high standards, to help guarantee trouble-free performance. Nevertheless, the display might have cosmetic imperfections that appear as small bright or dark spots.
C Agency Regulatory Notices Federal Communications Commission Notice This equipment has been tested and found to comply with the limits for a Class B digital device, pursuant to Part 15 of the FCC Rules. These limits are designed to provide reasonable protection against harmful interference in a residential installation.
1-800-HP-INVENT (1-800 474-6836) For questions regarding this FCC declaration, contact: Hewlett Packard Company P. O. Box 692000, Mail Stop 510101 Houston, Texas 77269-2000 (281) 514-3333 To identify this product, see the Part, Series, or Model number found on the product. Canadian Notice This Class B digital apparatus meets all requirements of the Canadian Interference-Causing Equipment Regulations.
The power cord set (flexible cord or wall plug) received with the monitor meets the requirements for use in the country where you purchased the equipment. If you must obtain a power cord for a different country, purchase a power cord that is approved for use in that country. The power cord must be rated for the product and for the voltage and current marked on the electrical ratings label of the product.
also supports similar power management features for the display. To take advantage of these potential energy savings, users must use the default power management settings that are provided with ENERGY STAR qualified computers and displays. The default power management settings on ENERGY STAR qualified computers are preset to behave in the following ways when the system is operating on AC power: ● Turn off an external display after 15 minutes of user inactivity.
offered for sale after July 1, 2006. To view the JIS C 0950 material declaration for this product, visit the HP website at http://www.hp.com/go/jisc0950.