
HP WebQoS for Windows 2000 and NT Release Notes

15
HP WebQoS for Windows
Installation Requirements
system for you. Otherwise, you must manually reboot the system.
Server 3 (SCI)
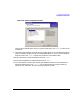
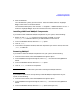
1. At the Welcome screen, click [Continue]. The WebQoS for Windows software is
unpacked.
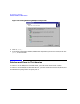
2. At the WebQoS Setup screen, click [Next].
3. At the Check Latest Patches screen, click [Next].
4. At the WebQoS License Agreement, click [Accept] to continue the installation.
5. The Document Information screen displays important information about this release of the
software. Click [Next] to continue the installation.
6. At the Customer Information screen, enter your user name and company information,
then click [Next].
7. The Choose Destination Location screen allows you to choose the location where the
program files are to be installed, or you can use the default path
(C:\Program Files\Hewlett-Packard\HPWebQoS). If you want to install the files to a
different location, click [Browse] and select the path for the new location. Click [Next]
to continue the installation.
NOTE In this release note, the location where the WebQoS program files are installed
is referred to as
<install-directory>
.
8. At the Setup Type screen, select Custom and click [Next].
9. In the Select Components screen, make sure only the following components are selected:
WebQoS Controller Interface
and click [Next].
10.The Select Program Folder screen allows you to add program icons to the selected Program
Folder. The default Program Folder is the HPWebQoS folder. Or you can choose a different
Program Folder. Click [Next] to begin the installation of the software files.
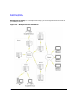
11.In the Configure WebQoS Database System screen, enter the name of the system on which
the database is installed (in this example, Server 1) and click [Next].
12.Enter a password to access the database and click [Next].
13.You must reboot the system after installing the WebQoS software. At the InstallShield
Wizard Complete screen, click [Finish] to have the installation program reboot the
system for you. Otherwise, you must manually reboot the system.