
HP Web Jetadmin - Using Microsoft SQL Server with HP Web Jetadmin
13
Method 1
One technique to migrate the existing HP Web Jetadmin database from the old instance to the new
one involves manually copying the database files from the old location to the new location. Database
files are located under the following directory:
DRIVE:\Program Files\Microsoft SQL Server\MSSQL.x\data (where x=1,2,3, and so on)
Directories are named MSSQL.1, MSSQL.2, and so on, depending upon how many instances are
installed under SQL Server. Locate the one that contains the database files for HP Web Jetadmin
named HPJWJA.mdf and HPJWJA_log.ldf. These files need to be copied to the same location under
the MSSQL.1, MSSQL.2, and other directories for the new instance.
Stop the HP Web Jetadmin service before copying the files. Backup the current blank database files
as a precaution. It is very likely that the previous database files have to be detached from the old
instance before copying to the new instance. Stopping the SQL Server service should allow the files to
be copied.
SQL Server Management Studio can also be used to backup/restore or detach/attach databases.
Stop the HP Web Jetadmin service before copying the files or manipulating databases in SQL Server
Management Studio.
Once the files have been copied or the database has been restored using SQL Server Management
Studio, start the HP Web Jetadmin service and use a client to verify success. Verify that All Devices
contains the number of devices HP Web Jetadmin contained before the migration.
Method 2
If the HP Web Jetadmin database has been backed up using the backup.bat script prior to pointing to
the new instance and database, SQL Server Management Studio can be used to restore the database
from the HPWJA_DB_BACKUP.dat file that was created using the HP Web Jetadmin backup.bat
script.
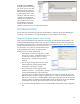
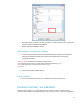
To restore the database using this method, stop the HP Web Jetadmin service under Administrative
Tools, Services. Start SQL Server Management Studio and connect to the new HPWJA_FULL SQL
instance (or whatever name was chosen for the new instance). Locate the database catalogue named
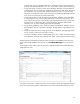
HPWJA listed in the navigation tree under Databases. Using the right-click menu, run Tasks, Restore,
Database. This launches a dialogue for selecting From Device as the source of restore data. Use the
dialogue launched through the … button to navigate to the file HPWJA_DB_BACKUP.dat that was
created by the backup.bat script. After the file is selected in the Restore Database dialogue, select the
Restore box in the listing of “…backup sets to restore”. At this point there is a backup.dat file
identified that will be used to restore data from the original database instance to the new one.
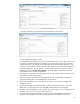
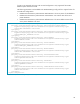
The file HPWJA_DB_BACKUP.dat also contains the paths to key database files on the old SQL
database instance. These file paths need to be changed. In the case of the initial HP Web Jetadmin
SQL database instance, the path could be “…\MSSQL.1\Data\...” In the case of the newer SQL
database created in this procedure, the path could be “…\MSSQL.2\Data\...” The path should be
set to the latter in the SQL Restore Database dialogue. To perform this operation, change the settings
page from General to Options, check the box labeled Overwrite the existing database and set the
paths listed under “Restore the database file as…” Remember, these should be changed from the old
SQL instance file paths to the new ones. In this example the following new paths are used:
DRIVE:\Program Files\Microsoft SQL Server\MSSQL.2\MSSQL\Data\HPWJA.mdf
DRIVE:\Program Files\Microsoft SQL Server\MSSQL.2\MSSQL\Data\HPWJA_log.ldf