
HP Web Jetadmin - OXPd Solution Installer in HP Web Jetadmin


8
14. Select the manifest file, and then click Next.
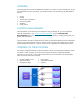
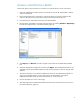
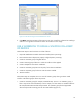
15. On the Settings page (Figure 7), specify the appropriate settings, and then click Activate
Choice for Solution to instruct HP Web Jetadmin to associate the entered values with the
highlighted solution. Then click Next.
Figure 7: HP Install Solutions Wizard and the Settings Page
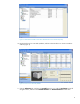
16. The Confirm page is the final page displayed before HP Web Jetadmin begins the install
process. The number of devices on which the solution will be installed is shown. The solutions to
install and their types are also shown. Click Install.
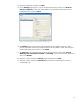
17. The Progress page is displayed showing the number of processes in each state: Success,
Warning, Error, Information needed, and Pending. To see more information about each
device, click Details.
18. When the install is complete, the Results page is displayed. Click Close.
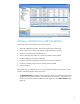
19. When the install is complete, the Solutions tab for the device indicates that the solution is
installed (Figure 8).