
HP Web Jetadmin - Creating Reports and Exporting Data


38
Last Collection Date: The date when HP Web Jetadmin last performed a data collection on the
device with this supply.
Supply: The name of the supply.
Supply Installation Date: The date when the supply was installed in the device. For this value to
be supported, the supply must be an HP Smart printing cartridge.
Supply Manufacturing Date: The date when the supply was manufactured. For this value to be
supported, the supply must be an HP Smart printing cartridge.
Supply Part Number: The HP part number of the supply.
Supply Serial Number: The serial number of the supply. For this value to be supported, the supply
must be an HP Smart printing cartridge.
Supply Status: Indicates whether the supply is a genuine HP supply or not.
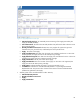
Sample reports
Sample reports showing realistic examples are available from the Reports – Report Generation task
module. By selecting any Report type and clicking on Sample, a report can be created. Although the
devices and data in the sample report are fictitious, the report is representative of a real report. All
the various options can be selected to see what the report will look like, with real-looking data. The
sample report that is created is also saved under the Reports – Archived Reports task module as an
HTML file.
Scheduling reports
In addition to generating reports manually, they can also be scheduled so that they are emailed or
saved to file at regular intervals. This is a very powerful automation feature.
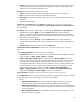
To create a scheduled report, follow these steps:
1. Select Report Generation in the navigation tree.
2. From the Reports – Report Generation task module, select a Report type.
3. Click Schedule.
4. Click through the report configuration pages, choosing appropriate settings (the options available
depend on the report type selected, as described in the ”Report type definitions” section, starting
on page 17).
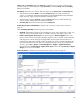
5. On the Specify destination options page, select how you want the report handled: Archive only
(saved under the Reports – Archived Reports task module on the Report Generation page) or
Email. If emailing the report, select the email addresses and File format for the email attachment
(HTML or CSV).
NOTE Selecting the Email option causes the report to be saved under the Reports – Archived
Reports task module as an HTML file.
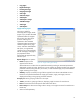
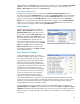
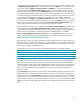
6. On the Specify schedule options page, select
the Schedule Start time and the Recurrence.
Values are Once, Daily, Weekly, or Monthly.
Each of these values has additional
parameters to choose from (Figure 39).
7. Click Next to display the Confirm page.
8. Click Create Schedule.
9. Click Done.
The scheduled task appears under the Reports –
Scheduled Reports task module on the Report
Generation page. It is also visible and
Figure 39—Specify schedule options