
HP Web Jetadmin - Creating Reports and Exporting Data


17
8. On this page, confirm your settings.
Click Back to change settings or
Cancel to abort this task. Click
Generate Report to create the report.
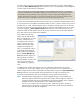
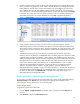
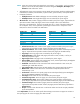
This displays the Report Generation
Complete page (Figure 20).
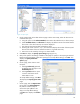
9. On this page, the Success message is
displayed. Options available on this
page are:
a. Save Report: Saves the report in
either HTML or CSV format.
b. View Report: Displays the report
immediately.
c. Done: Closes this page without
viewing the report. The report is
automatically saved in the
Archived Reports list.
d. Create report template: Allows
you to create and save a Report template based on the settings you just used.
It is possible that this page displays the message: “The report could not be generated”. This
typically means not enough data is available to create the report.
10. Click Done to complete the process.
This is the generic process to generate a report. Since all reports have both common and unique
configuration settings, the next section describes these settings and how they are used in creating
various reports.
Report type definitions
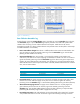
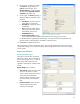
Accessory Inventory report
This report is used to show accessories
specific to a device, along with status of
the accessory (Figure 21). It is useful for
determining what accessories were
installed or removed over a defined time
period.
Report subtype has two options:
Time Interval: Shows accessory status
over time. This option is used to
create a report showing each device
with the following information:
Accessory Name, Accessory Status,
Accessory Details, and Collection
Date.
Last Known Status: Shows the date
and time when the status of an
accessory last changed.
Figure 20—Report generation complete
Figure 21—Accessory Inventory report settings