
HP Web Jetadmin 10.2 - Configuring Hard Disk Security

Page 6
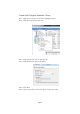
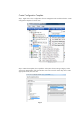
Step 7. The device property dialog box is displayed. Ensure that “standard” is displayed in the
“Show device properties” drop down. Then click on the “Device Property” drop down and
scroll until you find “Hard Disk”. Select “Hard Disk”. Make sure that the “Filter Function” is set
to equal and that the “Value” is set to “Yes”. Click OK.
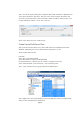
Step 8. Click “Next” then click “Create Group”
Create Secure Disk Device View
With a custom secure disk device view, devices that need to be remediated can be easily
identified. Additionally, the view can be filtered and exported to a csv file.
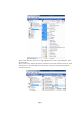
The secure disk data items are:
Hard Disk
Secure Disk – Encrypted hard disk
Secure Disk Mode – Encryption enabled/disabled
File System Password – required to be set in order to configure secure erase
Secure File Erase Mode – Secure fast erase / Secure sanitizing erase
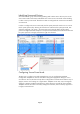
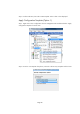
Step 1. Click on the Disk Security group and select the default layout.
Step 2. Right click on the column heading to select new data items. Click on customize at the
bottom in order to display full list of data items.