
HP VMA SAN Gateway Software Update Guide


3. Click DOWNLOAD for the appropriate VMA SAN Gateway OE Update Image version that
you want to download and save the download locally to the root directory of a portable USB
Flash drive connected to your laptop or server.
Note that saving the VMA SAN Gateway update download and extracting the contents to
the root directory on the USB flash drive enables the gateway CLI image fetch command to
discover the Gateway OE update binary file easily.
The VMA SAN Gateway OE update download is in a .zip file. The .zip file contains the
VMA SAN Gateway OE binary update file and an md5 checksum file so you can verify the
integrity of the binary update file.
4. Extract the binary Gateway OE update and md5 checksum files from the downloaded .zip
file to the root directory of the USB Flash drive.
5. To validate file integrity before proceeding, HP recommends that you perform an md5
checksum validation with the binary Gateway OE update file.
6. Safely remove the USB Flash drive with the downloaded Gateway OE update image from
your laptop or server.
Uploading the update image file to the VMA SAN Gateway
There are four USB ports available on the HP VMA SAN Gateway, two on the lower left front and
two on the lower right back of system.
1. Insert the USB Flash drive with the VMA SAN Gateway OE update image file into any available
USB port.
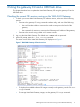
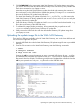
2. From the CLI connection to the VMA SAN Gateway, enter the following commands:
> enable
# configure terminal
# image fetch usb <tab>
Pressing the tab key causes the gateway to query connected USB devices for any .img files
and automatically completes the command if only one .img file exists or displays available
filenames if there are multiple. The following example auto-completed the command when the
tab key was pressed since only one .img file exists on the USB flash drive.
Uploading the update image file to the VMA SAN Gateway 7