
Configuring a Redundant Pair of VMA SAN Gateways - Process Guide


12
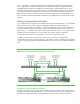
WARNING: It is important that the secondary gateway is not connected to the LAN or the VMA
Arrays at this time. The ‘secondary’ gateway will be setup and introduced to this existing
configuration later in the pairing process.
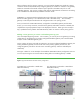
If your existing VMA SAN Gateway configuration is correct according to the above examples, then
proceed to the next step of the pairing process, ‘Update the Primary/Master VMA SAN Gateway’.
Merging two existing standalone gateway configurations
The merging of two existing standalone gateways, each with a separately connected array, into a
redundant pair of gateways while keeping existing configurations and data intact is not supported.
However you can still make use of the existing components to derive a redundant gateway pair. The
effort to do this is much more involved and complex than the prior two scenarios and involves fully de-
configuring and re-initializing one of the VMA SAN Gateways and its connected VMA Array. The
re-initialized gateway and array can then be added back into the remaining gateway configuration
later in the pairing process as though they were ‘new’ components in a similar manner as adding a
new gateway or array to an existing configuration.
After completing the pairing process, you can recreate LUNs and required data layout structures
(volume manager and filesystem structures) on the reinitialized array and data can be restored from
backup.
Note that this scenario process is only applicable to existing VMA SAN Gateways which have one
VMA Array singly attached to each gateway, because there is currently a maximum of two VMA
Arrays that can be connected to a redundant pair of VMA SAN Gateways. If you have a total of
more than two VMA Arrays to be connected to a redundant gateway pair, it is recommended that
you purchase additional VMA SAN Gateways to create a redundant gateway pair for every two
VMA Arrays as needed to connect all arrays.
In order to complete preparation requirements for this pairing scenario, please perform the following
steps:
• Choose which of the two gateway and array configurations will be de-configured and
reinitialized and which will be considered the existing ‘primary’ gateway configuration to be
added to.
• Fully back up data on the array connected to the gateway to be de-configured
• Disconnect the VMA SAN Gateway to be de-configured from the LAN.
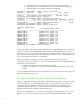
• Using the CLI on the VMA SAN Gateway, reset the configuration to factory settings and keep
the currently active gateway software license and Cluster ID by issuing the following
command:
# reset factory keep-basic
The ‘reset factory’ command will cause the VMA SAN Gateway to shutdown. Do not restart
this ‘secondary’ gateway until stated to do so later in the pairing process for configuration of
the secondary gateway.
• Using the CLI on the VMA Array (serial or Ethernet) re-format the array to the appropriate
usable capacity for your intended usage; 65% is optimal for OLTP and most I/O workloads.
Reformat the VMA Array using the following array CLI command:
> format chassis board 0 flash-capacity 65
• Power down and disconnect the reformatted VMA Array from the de-configured VMA SAN
Gateway