
Deploying Virtual Connect Enterprise Manageron Microsoft Cluster Service


9
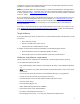
Installing a clustered instance of the Microsoft SQL Server 2005 Standard Edition
1. On the primary system, log into Microsoft Windows as a domain user with administrator
rights.
2. From the Run menu on any system in the cluster, enter comclust and press the Enter key.
Wait for the command to complete. Then run comclust on the remaining system in the
cluster. This executable sets up the MSDTC, a component for use in the cluster.
3. Insert the Microsoft SQL Server 2005 Standard Edition CD into the server that
currently owns all the shared disks in the cluster.
Note: This server is referred to as the primary system for the remainder of this section.
4. At the Run menu, enter D:\english\ent\autorun.exe (where D: is the drive letter of your
CD-ROM drive.)
Note: You can skip this step if the AutoRun feature is enabled on your primary system.
Note: If installing SQL Server from a network share or disk folder copied from CD, the
workaround for Microsoft Bug 408784 must be applied. For details, refer to the bug report
at http://support.microsoft.com/ (search for “Bug 408784”).
5. Click Next. The End User License Agreement window appears.
6. Review the License Agreement. You must accept the License Agreement before you can install
Microsoft SQL Server 2005 Standard Edition.
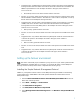
7. Check the box to accept the licensing terms and conditions. The Installing Prerequisites
window appears. Wait for the installation of the required software components to complete,
and ensure that the installation was successful.
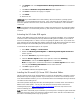
8. Click Next. The System Configuration Check window appears. Wait for the check to
complete, and resolve any errors or warnings reported.
9. In the Registration Information window, enter user information for your company.
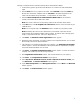
10. Click Next. The Components to Install window appears.
11. Select SQL Server Database Services, Create a SQL Server failover cluster, and
click Advanced. The Feature Selection window appears.
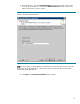
12. Open Client Components, select Management Tools, and click Next. The Welcome
window appears.
13. Click Next. The Instance Name window appears.