
HP Remote Graphics Software 6.0 User Guide

Manual Network Interface reconfiguration
To manually configure which network interface the Sender binds to, set the Sender property
Rgsender.Network.IsListenOnAllInterfacesEnabled=0 overriding the default which is to listen on all
interfaces. See
Network Interface binding properties on page 140, for more detail. If the Sender
property Rgsender.Network.IsListenOnAllInterfacesEnabled=0 then the RGS Sender binds to the
network interface specified by the Rgsender.Network.Interface.<x>.IsEnabled=1 property. To
determine the IP address of a network interface, perform the following steps on the remote computer:
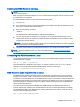
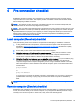
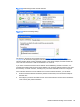
1. To view both network interfaces, click Start > Control Panel > Network Connections (see
Figure
4-1 Viewing network interfaces on page 28).
Figure 4-1 Viewing network interfaces
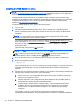
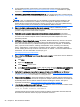
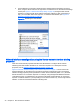
2. Double-click each LAN icon and the Support tab, which displays the network interface IP
address (see
Figure 4-2 Network Interface IP addresses on page 28). While this provides the
IP address of each network interface, it does not indicate which network interface is considered
the “first network interface”.
Figure 4-2 Network Interface IP addresses
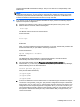
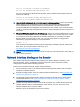
3. To determine which is the first (0th) network interface, click Advanced > Advanced Setting (see
Figure 4-3 Determining the first network interface on page 29). The Advanced Settings dialog
is displayed (see
Figure 4-4 Advanced Settings dialog on page 29). The “first network
interface” is listed at the top in the Connections box. In
Figure 4-4 Advanced Settings dialog
on page 29, the first network interface is Local Area Connection 3, which (from Figure 4-2
Network Interface IP addresses on page 28) has an IP address of 10.10.42.59.
28 Chapter 4 Pre-connection checklist