
HP Remote Graphics Software 6.0 User Guide


Receiver Control Panel
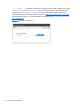
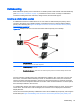
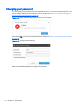
The Receiver Control Panel is used to perform the following tasks:
●
Establish a connection: To establish a connection to a remote computer, enter the hostname or
IP address of the computer. Press Enter or click the Connect button to connect to the remote
computer. The selector on the right side of the text box displays a history of previously
connected computers that can be selected.
●
Close a connection: To close a connection, press the Disconnect button.
●
View settings: Click
to view the tabs which provide access to many of the advanced
capabilities of RGS.
●
Display help: Click
to display the Help.
●
Display program information: Click
to display RGS program and copyright information.
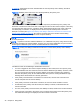
The Receiver Control Panel contains a status bar at the bottom of the window. The status bar
provides information that describes the current state of the RGS Receiver. For example, it displays
the messages “connection in progress”, “connection succeeded”, and “connection failed.” The status
bar can be useful in diagnosing connection problems because it also displays the general reason for
a connection failure, such as “Authorization Failed” or “Authentication Failed”.
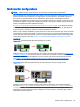
Creating a connection in Normal Mode
To create an RGS connection, enter the hostname or IP address of the remote computer in the
Hostname dialog box, and then press Enter or click Connect.
NOTE: The default Sender port number is 42966. The Sender port number can be changed using
the Rgsender.Network.Port property. If this property is used to change the Sender port number from
its default value of 42966, the Sender port number must then be specified in the above Hostname
dialog box, in either of the following formats:
hostname:port number
IP address:port number
For example, if the Rgsender.Network.Port property is used to change the Sender port to 42970, the
Sender IP address in the figure above would need to be modified to include the port number, as
follows:
15.2.76.29:42970
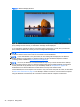
Provide a username and password, as prompted. If the connection succeeds, the Remote Display
Window will be displayed on the local computer, showing the desktop session of the remote computer
(see
Figure 5-7 Remote Display Window on page 44).
Using the Receiver 43