
Upgrading to Integrity VM Version 4.0 from 3.X


6
– Run vgexport(1M) on all non-root LVM volume groups, particularly if you plan to do a cold
migration. You can either do this directly via the command line, or you can use the Disks and
File Systems tools in the System Management Homepage (SMH) application. This will save all
of the LVM meta-data and allow you to access all of the logical volumes after the cold install.
All of these Integrity VM specific steps are fully documented in HP Integrity Virtual Machines Version
4.0 Installation, Configuration, and Administration, which is available at http://docs.hp.com.
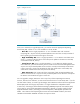
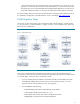
Cold Migration Steps
This process involves saving all key system configuration data and reformatting a root disk with the
11i v3 environment. A pictorial summary is in Figure 3, below. For the update process, please see
the next section, Update Steps.
Figure 3. Cold Migration Steps
Once you’ve completed all of the preparation steps (above), and you have saved the directory
/var/opt/hpvm in an easy to access place, perform the cold install of the VM host from either media
or a network depot. When you do so, please bear in mind:
If you are installing either the VSE-OE or the Data Center OE (recommended), then install
T2767BC(OE), Integrity VM at the same time to avoid unnecessary reboots. You must
explicitly select this from the software screen within Ignite-UX.
You must
not
select the following:
– HPSIM-HP-UX(OE), HP Systems Insight Manager Server Bundle
– T1335CC(OE), HP-UX Virtual Partitions for 11.31
– VseAssist(OE), Virtual Server Environment Configuration Assistant
– VSEMgmt(OE), Virtual Server Environment Management