
Securing Virtual Partitions with HP-UX Role-Based Access Control


9
Configuring HP-UX RBAC
Once your planning is complete, physically configuring the roles, authorizations, and commands is
relatively straightforward and consists of the following three steps:
1. Configuring roles for users
2. Configuring authorizations
3. Configuring additional command authorizations and privileges
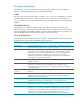
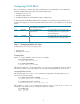
To demonstrate the HP-UX RBAC administrative commands, we’ll assume that your planning session
resulted in the mappings in the following table and that these fictitious users already exist on the target
system.
Users Roles Authorizations
(Note: Objects assumed to be *)
Typical Commands
nnie Operator hpux.vpar.admin,local
hpux.network.*
/usr/sbin/vparboot –p local_vpar_name
/usr/sbin/vparreset –p local_vpar_name
/sbin/init.d/ipfstat -io
luman BoxAdmin hpux.*
/usr/sbin/vparboot –p any_vpar_name
/usr/sbin/vparreset –p any_vpar_name
Step 1: Configuring Roles for Users
Configuring roles for users is a two-step process:
1. Creating roles
2. Assigning roles to users
Creating Roles
Use the roleadm command to create new roles, for example:
# roleadm add Operator
roleadm: added role Operator
# roleadm add BoxAdmin
roleadm: added role BoxAdmin
After defining valid roles, you can assign them to one or more users. Attempting to assign a role that
has not been created to users will display an error message indicating that the role does not exist.
Assigning Roles to Users
After creating valid roles, use the roleadm command to assign them to the appropriate users, as
shown in the following examples:
# roleadm assign luman BoxAdmin
roleadm assign done in /etc/rbac/user_role
# roleadm assign nnie Operator
roleadm assign done in /etc/rbac/user_role
After using the roleadm assign command to assign roles to users, you can use the roleadm list
command to verify that the roles were assigned correctly, for example:
# roleadm list
luman: BoxAdmin
nnie: Operator