HP I/O Hardware Upgrade Scripts Guide Document Part Number: CD Part Number: AD218-9000A AD218-1000A Version 1.
Table of Contents INTRODUCTION...................................................................................................................3 CAUTIONS ..........................................................................................................................3 NOTES ................................................................................................................................3 GENERAL UPGRADE INFORMATION ...................................................................
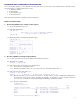
INTRODUCTION This document describes the necessary HP-UX operating system configuration changes required during the upgrade from the HP Integrity Superdome/sx1000 to the HP Integrity Superdome/sx2000. This document covers the upgrade products listed below: HP Integrity Superdome/sx1000 to the HP Integrity Superdome/sx2000. This hardware upgrade will change existing hardware paths due to the PCI-X 2.0 chassis upgrade included with these servers.
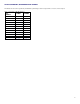
SX2000 SUPERDOME I/O HARDWARE PATH CHANGES The table below shows the Superdome I/O hardware path changes when moving from the sx1000 to sx2000 chipset: Table.
OVERALL UPGRADE FLOW The overall upgrade flow is: 1. Determine what is configured in each nPartition. 2. Determine the procedure that you will follow for each nPartition. 3. For each nPartition, perform the applicable pre-upgrade steps based upon what is configured, including the final shutdown of each nPartition. 4. Shutdown any non-HP-UX nPartitions. 5. Shutdown and power-off the complex. 6. Perform the physical hardware upgrade. 7.
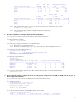
DETERMINING WHAT IS CONFIGURED IN EACH NPARTITION. Prior to the physical upgrade, you must determine how many OS instances are running in each nPartition and how each OS instance within the nPartition is configured. OS instances can be: A standalone nPartition A virtual partition A virtual machine guest A virtual machine host. Write down all the information in the table provided in Appendix 1. FINDING ALL THE OS INSTANCES: 1. How many nPartitions are running on this system? 1.1.
Virtual Partition Name ============================== vpar1 vpar2 vpar3 CPU Min/Max ======= 1/ 14 1/ 14 1/ 14 Num CPUs ==== 1 1 1 Num IO ==== 4 2 2 Memory Granularity ILM CLM ========== ========== 128 128 128 128 128 128 Memory (MB) ILM Virtual Partition Name ============================== vpar1 vpar2 vpar3 # User Ranges/MB Total MB ====================== 0/ 0 3072 0/ 0 3072 0/ 0 4096 CLM # User Ranges/MB Total MB ====================== 0/ 0 0 0/ 0 0 0/ 0 0 2.4.3.
disk 3 4/0/4/1/0.10.0 sdisk CLAIMED /dev/dsk/c2t10d0 /dev/dsk/c2t10d0s1 /dev/dsk/c2t10d0s2 DEVICE HP 73.4GMAT3073NC /dev/dsk/c2t10d0s3 /dev/rdsk/c2t10d0s2 /dev/rdsk/c2t10d0 /dev/rdsk/c2t10d0s3 /dev/rdsk/c2t10d0s1 Acpi(HWP0002,PNP0A03,404)/Pci(1|0)/Scsi(PunA,Lun0)/HD(Part1,Sig8786850EA951-11DA-8002-D6217B60E588)/\EFI\HPUX\HPUX.EFI 4.4. Check the root filesystem configuration in /etc/fstab: # grep -e stand -e '/ ' /etc/fstab # Note the space between quotes 4.4.1.
DETERMINING THE PROCEDURE THAT YOU WILL FOLLOW FOR EACH NPARTITION Pick the correct procedure for each nPartition. The procedure to follow depends on: 1. The existence of virtual partitions 2. The LVM or VxVM boot configuration. Using the table below, find the applicable procedure to follow for each nPartition. Note that you might need to follow multiple procedures for different nPartitions in the same Superdome complex.
PROCEDURE A This is for an nPartition that contains virtual partitions and the first vPar boots on an LVM configuration. Other vPars within the nPartition may boot on an LVM or VxVM configuration. PRE-UPGRADE STEPS 1. For each virtual partition that has an LVM boot configuration, perform the following: 1.1. Save the LVM root volume group configuration.
1.3. Ensure the above file system is bootable (i.e. has HPUX.EFI) Shell> ls fs0:\EFI\HPUX\HPUX.EFI Directory of: fs0:\EFI\HPUX 01/09/06 04:48p 521,494 HPUX.EFI 1 File(s) 521,494 bytes 0 Dir(s) where fs0 is the mapping index for the boot device found in step 1.2. 2. Boot from the identified boot device. 2.1. Change the EFI working environment to the EFI Map of the boot device: Shell> fs0: where fs0 is the mapping index for the boot device found in step 1.2. 2.2.
Following Physical Volumes belong to one Volume Group. Unable to match these Physical Volumes to a Volume Group. Use the vgimport command to complete the process. /dev/dsk/c9t8d0 /dev/dsk/c2t10d0s2 Following Physical Volumes belong to one Volume Group. Unable to match these Physical Volumes to a Volume Group. Use the vgimport command to complete the process. /dev/dsk/c9t10d0s2 The Volume Group /dev/vg00 was not matched with any Physical Volumes. 3.
2.0.11 [Memory Details] ... ... ILM Granularity (MB): ... ... CLM Granularity (MB): 10.2. 128 128 For all the virtual partitions, remove the old paths from the vPars database: # vparmodify -p vpar_name -d io:old_boot_path # Note: no :boot # vparmodify -p vpar_name -d io:old_path For example: # vparmodify -p vpar1 -d io:4.0.3.1.0.10.0.0.0.0.0 # vparmodify -p vpar1 -d io:4.0.4 10.3.
18.2. Go to the vPars console, press Control-A: # ^A [vpar_name] 18.3. Check that the boot device special filename as written down in preparation step 4.4.2 of the previous section titled Determining What Is Configured In Each Npartition maps to the correct hardware path (remember that the H/W path will have changed according to Table 1).
19. For all the remaining VxVM virtual partitions: 19.1. Boot the virtual partition in VxVM Maintenance Mode: # vparboot –p vpar_name –o –vm 19.2. Go to the vPars console, press Control-A: # ^A [vpar_name] 19.3. Update the device special files: # insf –e 19.4. Reboot the virtual partition: # reboot –s 19.5. Go to 19.1 for the next VxVM virtual partition.
PROCEDURE B This is for a nPartition that contains virtual partitions and the first vPar boots on a VxVM configuration. Other vPars within the nPartition may boot on an LVM or VxVM configuration. PRE-UPGRADE STEPS 1. For each virtual partition that has an LVM boot configuration, perform the following steps: 1.1. Save the LVM root volume group configuration.
EFI POST-UPGRADE STEPS 1. Search for boot device. 1.1. Using the EFI Boot Manager, enter the EFI Shell: Choose: “EFI Shell [Built-in]:” Shell> 1.2. Find the file system mapping for the boot device path of the first virtual partition using the mapping found in preparation step 4.3 of the previous section titled Determining What Is Configured In Each Npartition.
4. Update the primary and alternate boot paths (see step 2 for hardware path to use): # setboot –p 4/0/4/1/0.10.0 # setboot –a new_alt_path Now, update the vPars: 5. Mount the required filesystems: # mount /usr # mount /stand 6. For each virtual partition, 6.1. Run vparstatus –v and examine the [IO Details] section: # vparstatus –p vpar_name –v vparstatus: Warning: Not accessing live Monitor database, Requested resources shown.
10. At EFI, start the hpux bootloader and interrupt the autoload, if enabled: Starting: HP-UX Primary Boot: 4/0/4/1/0.10.0 (C) Copyright 2004 Hewlett-Packard Development Company, L.P.All rights reserved HP-UX Boot Loader for IPF -- Revision 2.027 Press Any Key to interrupt Autoboot \EFI\HPUX\AUTO ==> boot vmunix Seconds left till autoboot 9 Type 'help' for help HPUX> 11. Boot the vPars Monitor: HPUX> boot /stand/vpmon 12. At the Monitor prompt, boot the first vPar: MON> vparload –p vpar_name 13.
14.7. Activate the root volume group: # vgchange –a y /dev/vg00 Activated volume group Volume group "/dev/vg00" has been successfully changed. 14.8. Verify that the hardware path for the boot device matches the primary boot path. # lvlnboot –v /dev/vg00 Boot Definitions for Volume Group /dev/vg00: Physical Volumes belonging in Root Volume Group: /dev/dsk/ c9t10d0s2 (2/0/1/1/0.10.
PROCEDURE C This is for a nPartition that does not contain any virtual partition and boots using an LVM volume group. PRE-UPGRADE STEPS 1. Save the LVM root volume group configuration. The map and physical volumes files must be created in the / (root) directory, so that they can be accessed later while in LVM maintenance mode boot: # vgexport -m /mapfile.vg00 –p -f /pvs.vg00 /dev/vg00 vgexport: Volume group "/dev/vg00" is still active. 2. Backup the original ioconfig files: # cp /etc/ioconfig /etc/ioconfig.
2.3. Boot HP-UX in LVM maintenance mode: HPUX> boot –lm /stand/vmunix OS POST-UPGRADE STEPS 1. Check that the boot device special filenames as written down in preparation step 4.4.
6. Verify that the hardware path for the boot device matches the primary boot path. # lvlnboot –v /dev/vg00 Boot Definitions for Volume Group /dev/vg00: Physical Volumes belonging in Root Volume Group: /dev/dsk/c2t10d0s2 (4/0/4/1/0.10.0) -- Boot Disk /dev/dsk/c9t8d0 (2/0/1/1/0.8.0) Boot: lvol1 on: /dev/dsk/c2t10d0s2 Root: lvol3 on: /dev/dsk/c2t10d0s2 Swap: lvol2 on: /dev/dsk/c2t10d0s2 Dump: lvol2 on: /dev/dsk/c2t10d0s2, 0 7.
PROCEDURE D This is for a nPartition that does not contain any virtual partition and boots using a VxVM volume group. PRE-UPGRADE STEPS 1. Backup the original ioconfig files: # cp /etc/ioconfig /etc/ioconfig.bckup # cp /stand/ioconfig /stand/ioconfig.bckup 2. Update the ioconfig file using the executable found on the CD: # /sanddune_upgrade.ia64 -w /etc/ioconfig # /sanddune_upgrade.ia64 -w /stand/ioconfig 3. If this virtual partition is running X.25, update the X.
3.
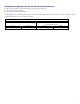
APPENDIX 1 EXAMPLE START OF UPGRADE WORKSHEET NPartition npar1 Cells 2&4 Virtual Partition vpar1 vpar2 LVM Boot Information /dev/dsk/c21t0d0s2 4/0/3/1/0.10.0 /dev/dsk/c9t8d0 2/0/1/1/0.8.0 /dev/dsk/c0t10d0s2 4/0/1/1/0.10.0 VxVM Boot X.
NPartition Cells Virtual Partition LVM Boot Information VxVM Boot X.
NPartition Cells Virtual Partition LVM Boot Information VxVM Boot X.