
How to use the HP-UX Portable Image Tool for Integrity fluid cross-technology moves

5
An example use case—Preserving VC-assigned MAC
addresses in HP-UX by enabling Portable Image (BL8x0c i2
Field Upgrade Service)
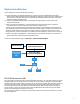
The HP-UX Portable Image product is installed and enabled on the blade server before the upgrade of a BL860c i2 to
BL870c i2 Blade Link Domain configuration. This is also applicable in using blade additions and combinations to upgrade
to a BL890c i2 server blade. After the upgrade, PI will automatically modify the HP-UX network instance numbers of the
new hardware environment so that they match the pre-upgrade environment. This takes advantage of the VCM
interconnect stacking links to allow all of the Monarch Server network connections to function correctly with no
corrections needed in the original VC server profile.
Portable Image can be used on VC configured systems where the VC domain has selected Virtual Connect assigned MAC
addresses instead of the static, factory-default MAC addresses. If you choose to use PI to assist the upgrade, there will
be a pre-upgrade step to follow on the designated Monarch Server and then another step to follow after the upgrade.
Pre-upgrade procedure for PI
These instructions are to be executed on the designated Monarch Server with the OS booted.
1. You need to obtain the PI package if it’s not already installed.
a. First, check for it being already installed by executing the following command:
swlist|grep HPPortableImage
b. If nothing is returned, then the package must be installed now. Go to software.hp.com and search for
“HP Portable Image”. Follow the link for HP-UX Portable Image in the product list and follow the instructions
there for installing the depot.
2. If your HP-UX 11i v3 release is September 2010 or earlier, then you must install the GIO cumulative patch
before proceeding.
a. Log into the HP IT Resource Center Web page at itrc.hp.com and follow the “Patch database” link under
“Downloads”. The site requires a quick registration.
b. Search for “PHKL_41525” and download the patch.
c. Follow the patch link and execute the installation instructions found there.
3. Enable PI by executing the following command:
kctune gio_portable_image=1
You should see the following:
Tunable Value Expression Changes
gio_portable_image (before) 0 Default Immed
(now) 1 1
Or
/opt/network/bin/hpuxpitool -e
4. The PI state must be saved to KRS before starting the upgrade. This is done by explicitly executing the PI save
command:
/opt/network/bin/hpuxpitool -s
5. Dump the saved PI state to a text file for possible use later. Obtain the dump by executing the following command:
/opt/network/bin/hpuxpitool –g
This will list out each network instance along with its pre-upgrade MAC address.
6. Shut down the OS using a “shutdown” command.