
Implementing disaster recovery for HP Integrity Virtual Machines with Metrocluster and Continentalclusters on HP-UX 11i


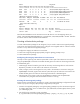

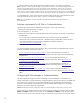
Table Of Contents
- Executive summary
- Introduction
- Audience
- Configuring Integrity Virtual Machines as packages in HP Metrocluster
- Verifying failover of Metrocluster packages across data centers
- Troubleshooting Metrocluster VM problems
- Application startup and monitoring
- Configuring Integrity Virtual Machines as packages in HP Continentalclusters
- Overview
- Software requirements for HP VMs in Continentalclusters
- Configuring HP VM packages in Continentalclusters
- Creating VM switches in all nodes of the primary cluster
- Configuring replicated storage for VM in Continentalclusters
- Installing the operating system on the virtual machine
- Testing the virtual guest OS in all nodes of the primary cluster
- Creating VM switches in all nodes of the recovery cluster
- Preparing the replicated storage for use in the recovery cluster
- Creating the virtual machine in all nodes of the recovery cluster
- Testing the virtual guest OS in all nodes of the recovery cluster
- Resynchronizing the replicated storage
- Packaging the HP VM in the primary cluster and the recovery cluster
- Creating a Continentalclusters package
- Creating a Continentalclusters configuration with the VM packages
- Running the Continentalclusters monitoring daemon in the recovery cluster
- Recovering to the recovery cluster
- Related documentation
- Appendix I
- Appendix II
- For more information
- Call to action

13
2. On each node in the recovery site, import the following disk groups: vmsecosdg, vmsecexedg, and
vmdatadg; and create the virtual machine vmmetro:
# hpvmcreate –P vmmetro –a dvd:scsi::disk:/var/os/hpvm.0505_OE.Gold1.iso\
–a disk:scsi::lv: /dev/vx/rdsk/vmsecosdg/osvol \
–a disk:scsi::lv: /dev/vx/rdsk/vmsecexedg/oraclevol \
–a disk:scsi::lv: /dev/vx/rdsk/vmdatadg/datavol \
–a network:lan:[hardware-address]:vswitch:vs1 \
–I vmmetro –O hpux
For more information on configuring virtual storage to meet the needs of the VM guests, see the
HP Integrity Virtual Machines Installation, Configuration, and Administration manual at
www.hp.com/go/hpux-hpvm-docs.
3. On each node, start the VM guest and install the operating system.
Notes:
1. In a Metrocluster environment, ensure that no disks managed by Metrocluster are shared between two VM guests
running on the same VM host. This is because each Metrocluster package manages a separate device group, and
you cannot have the same disk configured in more than one device group.
2. No two VM guests on a VM host can have the logical volumes of the same volume group configured as guest
storage. This is because a volume group cannot be shared between Serviceguard packages.
3. Serviceguard Metrocluster cross-subnet configurations are not supported.
Setting up an application inside the VM
Once the operating system is installed in the VM, the application can be installed inside the VM
guest. (In this example, it is assumed that the virtual machine is running HP-UX 11i v3.) The next step
is to install the Oracle application inside the VM.
Set up Oracle inside the VM such that the Oracle binaries reside on the local disks and the Oracle
database (application data) resides on the shared disks (data is replicated to the remote site).
Note: Although the disks are shared between the primary and secondary sites, Metrocluster helps ensure that only one
site has exclusive access to the disk at a particular time.
Disks inside the VM are virtualized by the VxVM logical volumes that are created above. To view the
mapping between physical storage and virtual guest storage, enter the
hpvmstatus command.
# hpvmstatus –P vmmetro
[Virtual Machine Details]
Virtual Machine Name VM # OS Type State
==================== ==== ======= =====
Vmmetro 7 HPUX Off
[Authorized Administrators]
Oper Groups:
Admin Groups:
Oper Users:
Admin Users:
[Virtual CPU Details]
vCPUs Type Entitlement Maximum
===== ===== =========== =======
1 10.0% 100.0%
[Memory Details] Total
Reserved
Memory Memory
=========== ===========
1 GB 64 MB
[Storage Interface Details]