
HP-UX Virtual Partitions Administrator Guide (includes A.05.09) (5900-2188, March 2012)


Starting the Virtual Partition Manager
Before you can start the virtual partition manager, vPars must be installed and running. For
information on installing vPars, see “Installing, Updating, or Removing vPars and Upgrading Servers
with vPars” (page 66). For information on installing the virtual partition manager, see “Installing
and Removing vPars-related Bundles ” (page 71).
After vPars is installed and running, you must boot at least one virtual partition to a HP-UX kernel.
You can then start the virtual partition manager in that virtual partition by executing the command
vparmgr
/opt/vparmgr/bin/vparmgr [-h]
/opt/vparmgr/bin/vparmgr -t create
/opt/vparmgr/bin/vparmgr -t modify|par_details -p vp_name
With no arguments, the vparmgr graphical user interface is launched. You can perform all
vparmgr operations from the GUI, as discussed below under using the graphical user interface.
Options
-h
displays usage instructions
-t create
creates a new virtual partition
-t modify
modifies an existing virtual partition. You must specify which virtual partition to modify, using the
vp_name parameter.
-t par_details
displays the status, attributes, and resources of a virtual partition. You must specify which virtual
partition to display, using the vp_name parameter.
-p vp_name
the name of a virtual partition
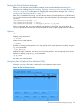
Using the vPars Graphical User Interface (GUI)
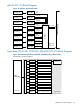
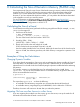
When the vparmgr GUI starts, it displays the virtual partition status screen.
Figure 32 vPars GUI Status Screen
About the Virtual Partition Manager (vparmgr) 271