
Administrator's Guide

• Many files that are specific to the system the recovery image was taken from are preserved.
This includes many log files, etc.
• When the kernel is rebuilt (in the "cloning" situation), drivers may be added as needed by
the hardware, but unused drivers will not be removed.
Cloning a system using make_net_recovery
The recovery configurations and archives created by make_net_recovery are stored in a
separate directory on the Ignite-UX server for each client. Using the configuration and archive
created by make_net_recovery on one system to install a different system involves manually
copying some configuration files and allowing NFS access to the source system’s archive.
A system recovery tape created using make_tape_recovery can also be used to clone systems.
The system you are installing by cloning must have a local tape drive so you can boot from the
system recovery tape.
The following example illustrates how to clone a system:
1. Use make_net_recovery or Ignite-UX to create a system recovery image of the source
system.
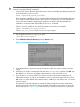
2. On the Ignite-UX server, if the client to be installed does not currently have a directory in
/var/opt/ignite/clients but is up and running, use the Ignite-UX GUI to create that
directory using Add New Client for Recovery from the Actions menu. For more information,
see “Adding clients for recovery ” (page 210).
If the client is not running, you will either need to boot it from the Ignite-UX server or from
media in order for this directory to be created.
3. Copy the CINDEX and recovery directory from a source client to the target client directory. If
the target client has previously used make_net_recovery, it will already have a CINDEX
file. If the CINDEX file for the client exists, you might want to save a copy and then edit the
file to add the desired entries from the source client. The following commands copy the required
files. You may specify src_client and target_client using either the MAC address or
the client’s hostname, which is a symbolic link to the MAC address:
# cd /var/opt/ignite/clients/src_client
# find CINDEX recovery | cpio -pdvma ../target_client
4. Give the target client NFS access to the recovery image of the source system. Typically each
target client has its own directory on the source system for storing the recovery images and
the directory is exported only to the individual client. To do this, log in to the system that holds
the recovery image (normally the Ignite-UX server).
For HP-UX 11i v3 systems:
• Edit the /etc/dfs/dfstab file on the source client.
• Append ,ro=target_client to the -o argument of the source client's line, where
target_client is a fully qualified client name.
• Run # shareall -F nfs
For HP-UX 11i v1 and 11i v2 systems:
• Edit the /etc/exports file on the source client.
• Append :target_client to the end of the source client's line, where target_client
is the hostname of the target system.
• Run # exportfs -av
See dfstab(4) or exportfs(4) for more information.
5. Boot the target client from the Ignite-UX server using any method you prefer. When you install
the system, you can select from the recovery configurations of the source system.
220 Recovery