
Administrator's Guide


IMPORTANT: HP recommends you boot from the Operating Environment (OE) media that
corresponds to the version of Ignite-UX you used to create your recovery tape. HP supports only
matched OE media and recovery tape version combinations.
Using unmatched versions might produce unpredictable results, including: missing files, error
messages, system hangs, and panics.
If you have misplaced the matching OE, or are using an Ignite-UX version with no matching OE,
you can make your own minimal bootable CD/DVD to support two-step media recovery. See
“Creating a boot CD/DVD or an installation DVD” (page 185), or see the section How do I create
the CD equivalent of a tape created by make_boot_tape? in the Ignite-UX Custom Configuration
Files document found on http://www.docs.hp.com/en/oshpux11iv3.html#Ignite-UX.
1. Insert the HP-UX OE media or the bootable custom media into the appropriate drive, and boot
from it. Either media must match the HP-UX version used when creating the recovery tape.
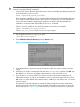
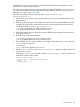
The User Interface and Media Options screen appears. Select Media only installation and
then OK.
User Interface and Media Options
This screen lets you pick from options that will determine if an
Ignite-UX server is used, and your user interface preference.
Source Location Options:
[ * ] Media only installation
[ ] Media with Network enabled (allows use of SD depots)
[ ] Ignite-UX server based installation
User Interface Options:
[ * ] Advanced Installation (recommended for disk and file
system management)
[ ] No user interface - setup basic networking, use defaults
and go
[ ] Remote graphical interface running on the Ignite-UX server
Hint: If you need to make LVM size changes, or want to set the
final networking parameters during the install, you will
need to use the Advanced mode (or remote graphical
interface).
[ OK ] [ Cancel ] [ Help ]
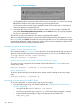
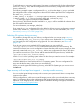
2. Media Installation
This screen provides an option to switch the install source
from the default CD/DVD to a recovery tape. This is helpful
for those systems and for tape devices which do not support
booting from a tape.
[ ] CD/DVD Installation
[ * ] Boot from CD/DVD, Recover from Tape
[ OK ] [ cancel ] [ Help ]
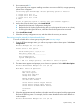
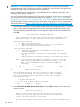
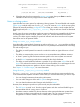
3. Select Boot from CD/DVD, Recover from Tape and select OK to advance to the Tape Drive
Selection screen:
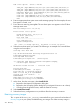
Tape Drive Selection
There are one or more tape drives detected on the system.
Insert your recovery tape into one of the drives and then
select that drive from the list below.
Use the <tab> and/or arrow keys to move to the desired TAPE device,
218 Recovery